|
|
|
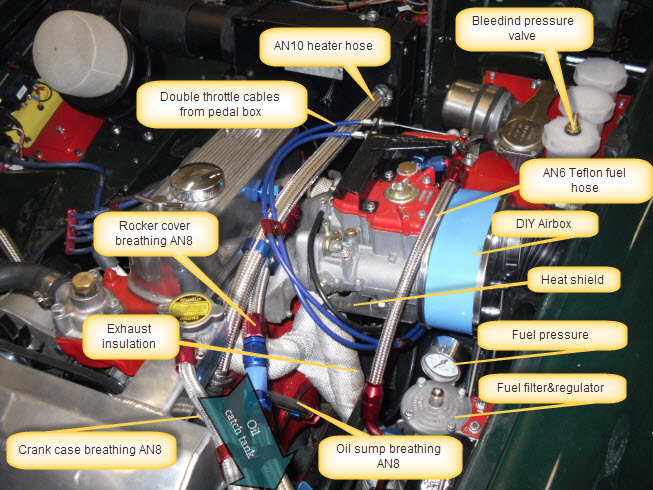
Polttoainejärjestelmä
Ongelmat
Polttoainejärjestelmän perusongelma tuli ilmi kesän 2014 alppiosuuksilla:
bensa höyrystyi kovissa lämpötiloissa ja korkeassa ilmanalassa.
Tällöin kaasarin (Weber DCOE 40) bensakammioon syntyy höyrysulku:i
höyrystynyt bensa sulkee kohon estäen siten bensiinin saannin bensapumpulta
(Facet sähköpumppu). Kun höyrysulku on syntynyt, ei tähän auta
kuin odottaa moottorin jäähtymistä. Tätä ongelmaa ei
kylläkään esiinny Suomessa ajettaessa, mutta hurahdinkin 2015 reissulla
täysin alppiränneissä ajeluun ja tulen varmaankin vuosittain tekemään
reissun johonkin sopivaan alppimaahan Euroopassa.
Höyrysulun pystyy estämään:
- sijoittamalla bensapumppu taakse bensiinisäiliön yhteyteen
- eristämällä pakosarja eli johtamaan lämpö pois
- asentamalla heijaste-/eristelevy kaasarin ja pakosarjan väliin
- parantamalla konehuoneen ilman vaihtuvuutta
|
|
Fuel System
Problems
The basic problem with the current fuel system appeared during the 2014
European Alps trip: the fuel vaporised at higher altitudes and temperatures.
This caused the fuel chamber in the Weber carburetor (DCOE 40) to be filled
with fumed fuel. This fume closed the fuel chamber valve thus
preventing the fuel pump to pump any fuel to the system. When
this happens, there is only one way to solve it: wait until the engine has
cooled down. This problem is very rare but got
advice from some old Mini racers.
You can prevent the fuel vapour lock from happening by:
- placing the fuel pump at the fuel tank end (mine was at the engine bay)
- isolate the exhaust pipe in order to lead the heat out of the engine bay
- install a reflection or isolation plate between the carburétor and the
exthaust
- improving the ventilation of the engine bay
|
|
|
|
Höyrystyneen bensan jälkiä suuttimissa !
This is what vaporised fuel causes - look at the main jet ! |
|
|
|
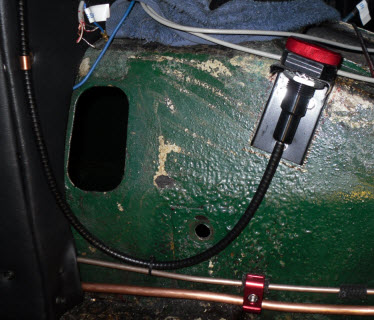
Bensapumppu
Konehuoneessa ollut Facet pumppu siirtyi takakonttiin aivan bensatankin
yläpuolelle. Pumppuun piti tehdä letkunippojen tilalle 1/4 NPT kierteet AN6
sovittimelle. Sähkönsyöttö kulkee ohjaamossa olevan 'tappokytkimen'
kautta eli pumpun saa pysäytettyä katkaisematta virtoja.
Huom: Bensapumppu väärin asennettu. Pitäisi olla pysyssä. |
|
Fuel Pump The existing Facet fuel pump was
moved to the boot where it is just above the fuel tank. I had to make
1/4 NPT threads to the pump as it had direct hose connectors. Power to
the pump is fed through a 'kill switch' in the cockpit 'FIA panel'.
Thus the pumpt can be powered off while having the ignistion still on.
Note: The pump is installed wrong way. It should be upwards! |
|
|
|
 |
|
|
|
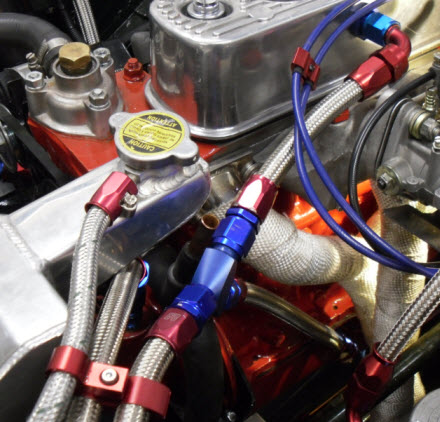
Putkitus
Samassa yhteydessä päätin vaihtaa kaikki putkistot ja käyttää niissä AN6
liityntöjä ja letkuja. AN6-liitynnät ovat lähinnä luotettavuuden
ja kenties myös ulkonäönkin takia.
AN-letkujen rakentaminen on helppoa kunhan oppii perustekniikat.
Näistä löytyy paljon Youtube-videoita - kannattaa katsoa!
Ongelmallisinta on kovan putken liittäminen letkuun, sillä tämä vaatii
adapterin hitsaamisen putken päähän ja tietysti AN-kierteet ovat
UNF-kierteitä eikä siten putkiyhteitä voi käyttää.
Kuparinen bensaputki kulkee ohjaamon puolella kardaanitunnelin vieressä.
Päädyin tähän ratkaisuun siksi, että muutkin putket kulkevat ohjaamon
puolella eikä alustassa. Putki kulkee niin hyvin suojattuna, että ei ole
vaaraa, että se vahingoittuisi. Alustassa alkujaan kulkenut
putki oli saanut hieman iskuja kivistä ja olikin lytyssä muutamin kohdin.
Tämän takia sähköinen bensapumppu (Facet) oli käytännössä jatkuvasti päällä. |
|
Fuel lines
While updating the fuel system I decided to use AN6 connectors and hoses
throughout the fuel line. Most of the fuel line is 8 mm copper
tube. The AN connectors are used for their reliability (and looks).
It is quite easy to make AN hoses after you have learned the basic
techniques. Google videos of 'making AN hoses'. Most
problematic issue with AN connectors is when you have to connect a hose to a
pipe. AN connectors have UNF threads and you must use an weldable AN
adapter to make the connection.
The copper fuel pipe is routed through inside of the cockpit. I
ended up to this solution as there are several tubes and wires already
relocated going inside the car rather than under the floor panel.
For example the fuel pipe is originally installed so that it has to make a
crossing before entering the engine bay. In my car the pipe had
already gotten several hits and was partially crushed. This blocked
the fuel flow and further caused the fuel pump (12V Facet) to be always on.
|
|
|
|
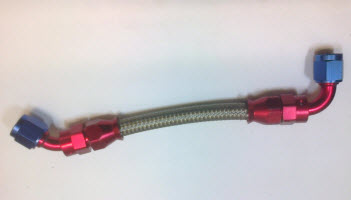
AN6 braided fuel hose (Teflon) |
|
|
|
|
|
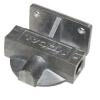
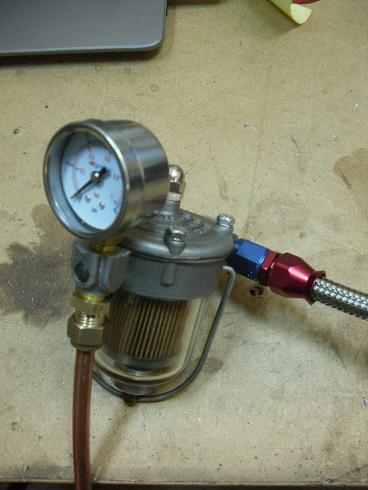
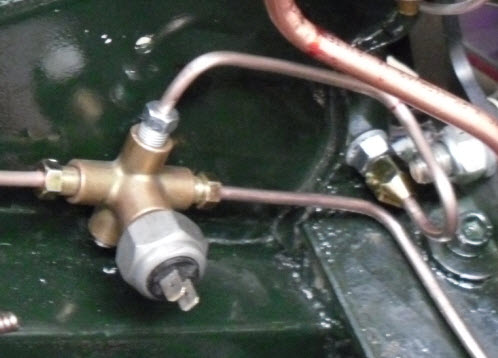
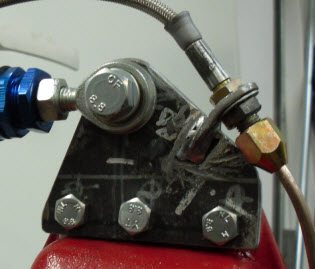
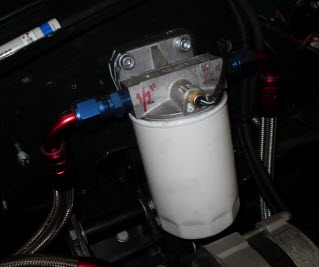
Suodatin Bensasuodatin on EVO3:ssa todella special versio, sillä asensin
vanhaan paineensäädin-suodattimeen painemittarin samalla kun piti tehdä täysin uudet liitynnät kupariputkelle
ja AN6 letkulähdölle.
|
|
Fuel filter The existing fuel pressure+filter
unit was a target for several modifications. All hose connectors were
replaced with NPT threads and a pressure gauge was innstalled too. |
|
|
|
 |
|
|
|
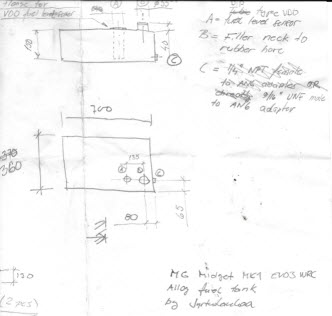
Bensatankki
Midgetin 25 litran bensatankki on osoittautunut auttamattoman pieneksi
varsinkin matka-ajossa. Pitkällisen harkinnan jälkeen päädyin
tilaamaan mittatilaustankin UK:sta alla olevan 'tarkan' piirustuksen
perusteella. Tankki tulee vaahdotettuna ja varustettuna VDO:n
putkityyppisellä löpöanturilla. Ainakin toivotaan näin, kun tuo piirustukseni ei
kovin tarkka ole :) |
|
Fuel tank
Midget has a very small fuel tank for touring (25 liters) and my Stage2
lady consumes about 11-12 liters/100 km. After very long consideration
I decided to order a custom 40 liter alloy tank from
Alloy Racing Fabrications
in UK. It will be foam filled and equipped with a VDO dip type fuel
level sensor. Hopefully I get a tank that fits as my drawing was
very accurate indeed :)
|
|
|
|
 |
|
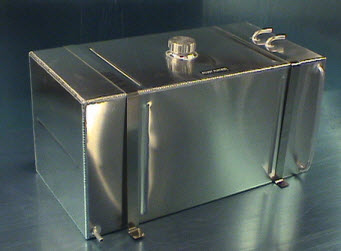
Vakiotankki 40 L
Universal 10 gallon alloy tank |
|
|
|
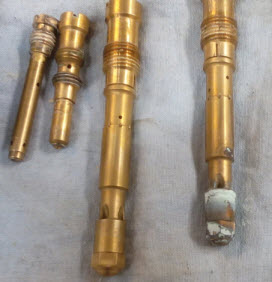
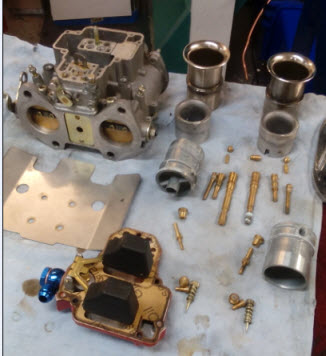
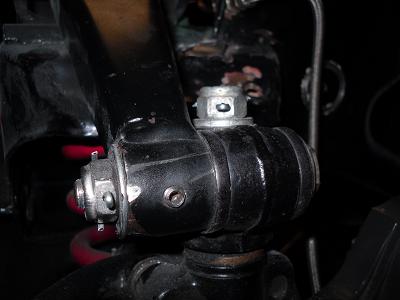
Kaasutin
Weber 40 DCOE on osoittautunut luotettavaksi kaasariksi, mutta todella
vaikeaksi säätää, koska yhdellä tuplakaasarilla hoidetaan neljää sylinteriä.
Ongelmallisin kohta tällä hetkellä on 2800-3000 RPM 'kuollut' alue. Tämä
alue on se, jossa kaasari siirtyy käyttämään pääsuutinpiiriä ja hajotinta.
Täytyy ottaa testiajolle mukaan liuta suuttimia ja kenties kurkkujakin ja
koettaa löytää sopiva kompromissi tehojen suhteen.
Kuvassa näkyy Weberin alle tuleva rosterinen lämpökilpi. Kuva on otettu
ennen puhdistusta. Höyrystyneen löpön takia joka paikassa on
kalkkeumia. Jostain syystä oikeanpuoleinen kanavisto on paljon
huonommassa kunnossa kuin vasen!? |
|
Carburetor The Weber 40 DCOE carburetor
has proven to be very reliable and maintance free. Unfortunately it is
very difficult to adjust to provide full power over the whole RPM range. The
most problematic range is at 2800-3000 RPM. At this stage the
idle jets stop providing fuel mixture and control is moved to the main jets
and specially the venturi tube comes into play. Only way to solve this
problem is trying to change jets and even then you may just achieve a
compromise. In the picture below, you can see the brand new heat
shield that will be installed under the carburetor. The picture has been
taken before cleaning. You can clearly see that the vaporised
fuel has left lot of resedues (white stuff) everywhere indise the
carburetor. |
|
|
|
 |
|
|
|
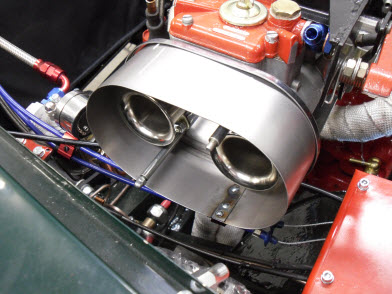
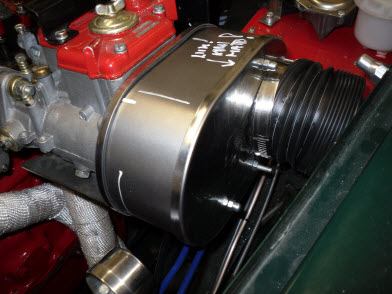
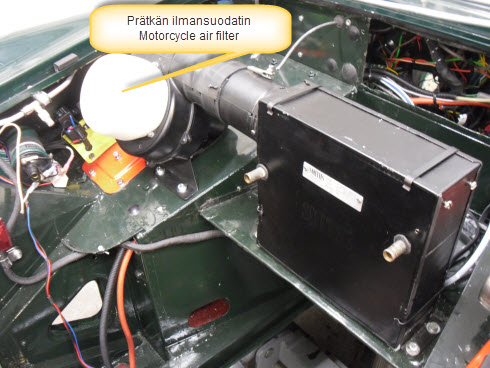
Ilmansuodatin
Ilmansuodatin oli sinällään tehokas K&N suodatin, mutta sijaitsi kaasarin
päässä suoraan pakosarjan yläpuolella. Täten ottoilman lämpötila on
kuumalla säällä ollut todella korkea erityisesti ajettaessa hitaasti. Bensamoottorin tehojen
kannaltahan on olennaista, että kaasarin ottama ilma on mahdollisimman
happipitoista ja sitä se on, mitä kylmempää ilma on.
Nykyautoissa ilma otetaan hyvinkin monimutkaisen ilmakanaviston kautta,
mutta laiskana päädyin tekemään itse halvan 'cool air box' yksikön.
Kaupalliset versiot maksavat sitten luokkaa 400-500 € ja tämä toimiva
viritelmä kentien 10 € (ilman suodatinta).
Suodatin on 75mm lerppaletkun perässä ja oli pakko hankkia melko arvokas
K&N:n sylinterimäinen 200 mm pitkä suodatin. Alla olevassa kuvassa
näkyy syykin eli lokasuojan alle ei mahdu kovin suurta suodatinta.
Etenkin kun pedalboxi on viemässä tilaa.
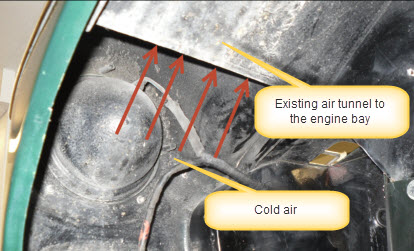
Suodattimen paikan pitäisi olla optimoitu laiskuuden ja kylmän ilman
saannin suhteen. Midgetin lokasuojan ja sisälokasuojan välissä on n.
80 mm tuuletusrako, jota kautta nähtävästi on suunniteltu koneen saavan
muutenkin raitista ilmaa. Vaihtoehtoisesti suodatin olisi
pitänyt vetää keulamaskin taakse ennen syyläriä, mutta tämä olisi vaatinut
reikien tekemistä ja paljon lerppaletkua- |
|
Air filter unit (cold air box) The existin
K&N air filter was big enough but as it was located straight over the
exhaust pipes (3-2-1). Thus the air the carburetor was getting
was very hot - specially on hot days and slow speed. The known
fact is that the cooler the air is, the more oxygen it contains in a given
volume. And combustion engines need oxygen to burn the fuel
efficiently. Typical solution for this problem in track&racing cars is to
use a cold air box. This is simply a box at the carburetor end from
which a hose is used to connect an external airfilter. I couldn't find
any reasonable priced cold air box and decided to make it myself. As a
lazy engineer I used as much as possible existing parts in the K&N filter
body. All I needed to make was a steel band as wide as the original
filter and then a hole and 75 mm flange to the end lid if the existing
filter. From there a spiral hose is used to connect the gigantic
K&N cylinderical 200mm long air filter. Location of the filter is well
thought when it comes to getting as cool air as possible. There are already
a ventilation channels between the wings and the inner wheel arches.
Optionally the filter could be located behind the front grill but this would
have required plenty of hose and cutting holes for it. |
|
|
|
Vakio K&N suodatinrunko, jossa suodatin korvattu peltipannalla.
Standard K&N filter unit having the filter replaced with a steel band. |
|
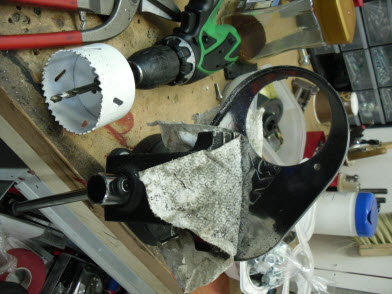
75 mm reiän poraaminen suodattimen kanteen
Drilling a 75 mm hole in the K&N filter lid |
|
|
|
75 mm liitäntälaippa porattu K&N kanteen ja tästä lerppaletku
suodattimelle
A hole for a 75mm flange drilled to the K&N lid and a flex hose is
connecting it to the actual air filter.
|
|

K&N:hypersuuri suodatin piilossa. Liitososat ovatkin sitten Biltemasta ...
The hidden K&N's hyper large air filter with piece of duct
|
|
|
|
|
|
|
|
|
|
Alkuun / Top
|
|
|
|
Sähköjärjestelmä
Sähköjärjestelmässä ei ole oikeastaan esiintynyt lainkaan vikoja koko
aikana. Päätin kuitenkin selkiyttää sitä eriyttämällä kaikkien
lisälaitteiden johdotukset omiksi johtosarjoikseen. Alkuperäisestä
johtosarjasta ei siis 'ryöstetä' virtaa mihinkään apulaitteeseen vaan niille
on täysin itsenäinen jännitesyöttö ominen sulakkeineen. |
|
Electrical system
The electrical systems have worked without any problems since EVO1.
However, I decided to make iseparate looms for all the extra wires and leave
the original loom intact. This makes it easier to spot any problems
within the electrical connections. The extra electrical
equipment have even their own fuses. |
|
|
|
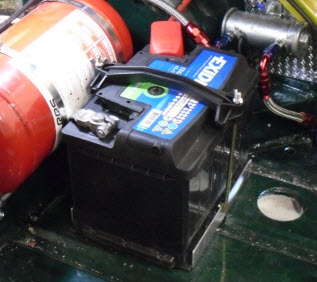
Akku Sähköprojekti alkoi akun siirtämisellä takakonttiin, jotta
taka-akselistolle tulisi hieman lisää kuormaa. Ajelen
pääsääntöisesti yksin eli painoa tarvitaan pelkääjän puolelle.
Akkuteline syntyi helposti alumiinisesta kulmaprofiilista ja Bilteman
akkukiinnikkeistä. Akkukaapelille (25 mm2) tulee kylläkin hieman
mittaa ja se pitää suojata todella hyvin.
|
|
Battery
The electrical project started with a major change: moving the battery to
the boot in order to get additional weigth to the rear axle. As for
certain reasons I drive almost all the time alone, the additional weight is
located at the opposite side of the driver i.e. on right on a LHD car.
|
|
|
|
 |
|
|
|
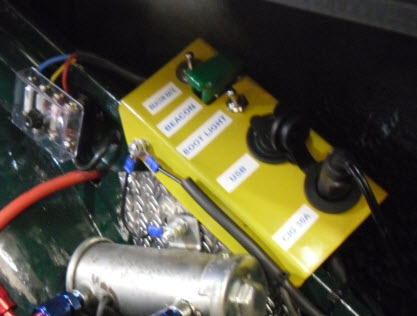
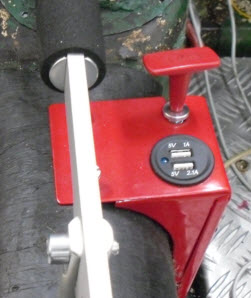
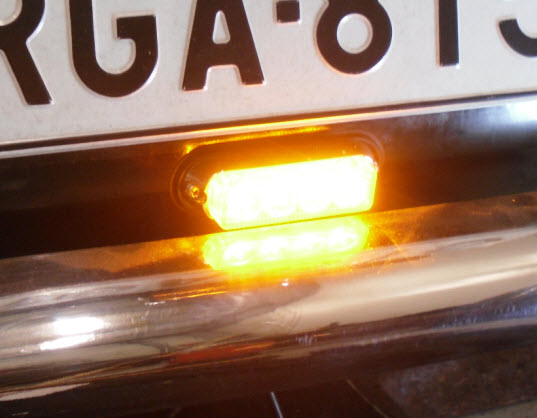
Takakontin virtapaneli
Reissun varrella olen monesti kaivannut autoon hätävilkkuja.
Etenkin kuuluisilla alppireissuillani auton saattaa joutua parkkeeraamaan
teknisen vian takia todella vaaralliseen paikkaan. Wanhankin auton
vilkut saa kytkettyä hätävilkuiksi sopivilla releillä, mutta halusin autoon
kunnon hätämajakan, joka näkyy taatusti pitkälle. Nykyaikainen
LED-valotekniikka on mahdollistanut todella pienikokoiset vilkkumajakat ja
löysin IKH:sa halvahkon neljän keltaisen ledin version sellaisesta.
Hätämajakan saa kytkettyä päälle joko takakontissa olevasta kytkimestä tai
sitten auton kojelaudasta olevasta 'FIA-panelista'.
Toinen asia, jota olen aina kaivannut, ovat sytkäliitynnät - erityisesti
USB-versiot. Niitä löytyy EVO3-versiosta peräti kolmesta eri paikasta:
takaluukku, kardaanitunneli ja 'hanskalokero'. Nyt voin
reissussa pitää TomTomia, kännykkää, työvaloa jne. jatkuvasti kytkettynä ja
alkuperäistä tupakansytytintä siihen mihin se on tarkoitettukin.
Ja kolmantena asiana: työvalot! Jos autosi laukeaa, laukeaa
se taatusti pimeällä. EVO3:ssa asensin takakonttiin ja
konehuoneeseen pienen mutta tehokkaan LED-valaisimen. Hyvästi siis
taskulampuille.
|
|
Boot switch panel During my long tours I would have several times needed some sort of
hazard lights. Specially in the Alps it is very dangerous if you have
to park the car on a narrow road due to technical problems. It is
pretty easy to change the existing indicator lights to work as emergency
lights as in modern cars. I ended up to use a LED operated beacon
instead. Anyone will definately spot the blinking beacon and react to
it - at least I hope so. The beacon can be switched on from the
boot switch panel or the 'FIA-panel' in the cockpit.
Another thing that has bothered me all the time is lack of USB sockets.
Nowadays almost everything can be charged via a USB cable. EVO3 has
three double USB sockect: one for the TomTom navigator and action camera,
one for phone etc. and one in the boot for charging work lights.
Now I can use the original cigarette lighter for it is originally meant for.
Third minor issue is fixed working lights in the boot and engine bay.
Modern LED based lamps are very small and yet effifient and thus very easy
to install.
|
|
|
|
 |
|
|
|
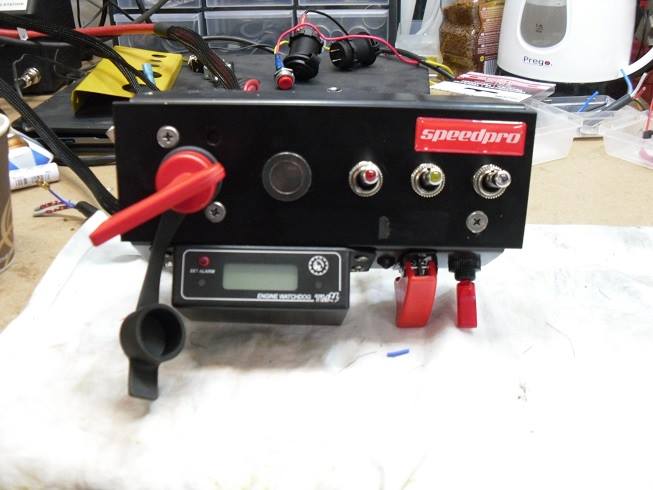
Päävirtapaneli Jo EVO1 versiossa autossa oli päävirtakatkaisija, mutta tämä katkaisi
pelkästään maan . Se ei siis olisi sammuttanut autoa
hätätilanteessa. EVO3:ssa päävirtakatkaisijoita on peräti kaksi
kappaletta, joista toinen FIA-hyväksytty ja toinen a'la Biltema.
Sähkön syöttö akun plussasta (!) kulkee ensin auton perässä olevaan
Biltema-katkaisijaan ja siitä edelleen auton ohjaamon/lattian kautta
keskikonsolissa olevaan FIA-pääkytkimeen. FIA:kin voi ihmetellä,
miksi yksi päävirtakytkin on auton perässä eikä konepellin vieressä,
kuten säännöt vaativat. Syy on yksinkertainen: jos auto syttyy esim.
tuleen, palaa se konehuoneessa ja virtojen sammutus on turvallisinta
mahdollisimman kaukana sieltä.
FIA-hyväksytyssä 6-napaisessa kytkimessä on rele, jonka kautta vedetään
syöttö auton virtalukolle. Kun päävirta katkeaa, katkeaa samalla
sytytysvirta eli auto sammuu taatusti. Alkuperäinen virtalukolle tuleva
(valkoinen) virtakaapeli jää turhaksi ja sitä EI saa kytkeä mihinkään.
Hankin FIA-kytkimen
Björk Motorsportista (JKL) ja lähes samaan hintaan löytyi Speedpro:lta
versio, jossa kytkin on valmiiksi paneelissa. Tätäkin panelia
piti hieman viritellä eli lisätä siihen lisää kytkimiä apupaneleineen.
Samaan syssyyn löysin hyvän paikan moottorin vahtikoiralle elli
digitaaliselle lämpötilamittaristolle (ks.
Watchdog).
Kytkimiin en katsastusmiehen kiusaksi laita mitään merkintöjä, mutta ovat
vasemmalta ylhäältä lukien:
- FIA-päävirtakytkin (kuvassa ON-asennossa)
- pissipojan pumppu ... turha koettaa startata tästä painonapista :)
- sumuvalot
- lisäkaukovalot
- takasumuvalo
- Watchdog
- Bensapumpun hätäkatkaisu (suojattu kytkin)
- Hätämajakka =hätävilkku takana (suojattu kytkin) ks.
Turvallisuus
Johtojen värit eivät 'täysin' vastaa Lucas-väritystä, mutta antavat
hieman osviittaa, kumpaan virtapiiriin kuuluvat (ignition on vai battery).
|
|
'FIA' switch panel
I had a main swithch installed already in the EVO1 version but this
version only cut the ground of the battery. This wouldn't have stopped
the engine in case of emergency. In EVO3 there a two main switched:
one FIA-approved and one basic cheap one. The positive lead in
from the battery (in the boot) goes first to the one installed at the rear
of the car and from there to the FIA-switch installed in a panel under the
cockpit dash. Reason for having one switch at the rear is
that an 'outsider' can use it in a emergency situation.
FIA may wonder why at the rear, but in my mind it is the safest place to be
if the car is oin fire.
The FIA approved six pole switch has a built in relay for ignition
feeding. When the main power goes off, the ignition power is
automatically cut off thus 'killing' the engine for sure. The original
feed wire (brown/white?) connected to the ignition lock must be removed and NOT
used for any purpose.
I bought the FIA switch installed in a panel with four additional normal
switches (manufactured by Speedpro). I used this panel but added
an extra panel at the bottom of it for even more switches and the digital
engine temperature display (see Watchdog).
I changed the original on/off swithes to versions having colored LED bulps in
them. Thus there is no need for separate tell tales.
I will not mark the swithces just to tease MOT inspectors. Anyway,
their functions are listed from top left:
- FIA mains switch (in ON position in the picture below)
- Washer pump (sorry, no electrical starter relay)
- Fog lights
- Spot lights
- Rear fog light
- Watchdog unit
- Fuel pump emergency shut off (under a cover)
- Rear emergency beacon (under a cover). See Safety ...
The wiring colors don't 'quite' match the original Lucas coding but give
some clue what they are (ignition on or direct battery based). |
|
|
|
 |
|
 |
|
|
|
Lämpövahti Olin jo itse tekemässä moottorin lämpöjen seurantaa ja hälytystä varten
jotain viritelmää, kun törmäsin valmiiseen Australiassa
valmistetuun tuotteeseen UK
eBay:ssä: Engine Watchdog. Viritetyn auton ongelmana ovat aina
lämpötilat (vesi tai öljy) ja jos ei musta seurata mittareita, on edessä
kallis koneremontti! Tämä aparaatti ratkaisee kerralla kaikki
huoleni, sillä se mittaa kahdella anturilla lämpätiloja ja optiona on
liityntä maadoittavalle kytkimelle, joka laukaisee laitteessa 90 dB
hälytysäänen.
Olennaista on, että lämpötilat mitataan TODELLISTA
lämpötilaa. Veden lämpö ei sinällään ole 'olennaista' vaan
sylinterilohkon lämpötila (vaikka ovatkin yleensä samat). Tämän takia
yksi sensoreista asennetaan lohkon kyljessä olevan pultin taakse.
Vastaavasti öljyn lämmön voi mitata useasta kohdasta (suodatin, lauhdutin,
termostaatti), mutta tärkein tieto on öljypumpun imemän öljyn lämpötila.
TM4:ssa optiona olevaa maadoittavana kytkimenä käytän alhaisen öljynpaineen
anturia. Kun paineet putoavat alle 2 PSI , antaa laita tästä
hälytyksen. Anturi on special-versio normaalista paineanturista, sillä
vakioanturi 'hälyttää' vasta 1 PSI:ssä eli liian myöhään.
|
|
Watchdog I was
already planning to make my own alarm system for engine overheating and low
oil pressure when I run to this Australian product at
ebay UK. A classic car - specially a tuned version - has
always problems with engine temperatures. It
helps to have dial for water temperature and oil pressure. However, if
you forget to keep your eye on these, it may be too late to spot the
overheated engine. This Watchdog solves all my problems and even
more: one sensor for water temp, one sensor for oil temp and one sensor for
low oil pressure. In addition of showing the temperatures, you
can set alarms for them. The box gives a loud 90 dB audible
sound when the limit has been exceeded.
It is essential that the temperatures are to be measured where the
sensors can measure the TRUE temperature. The water temperature
is not relevant information but the temperature of the cylinder block
is (in most cases water temp = block temp). So one sensor is
attached to some bolt fixed directly to the engine block.
The oil temperature at the filter head, cooler or thermostat is not relevant
- the temperature of the oil in the oil pan is (measured at the
suction side). The optional third 'sensor' is just a ground wire that can be used to
trigger the alarm of the TM4 unit. I changed the low oil
pressure switch to a version which grounds itselft already at 2 PSI instead
the standard 1 PSI (which is too late for setting an alarm). |
|
|
|
 |
|
|
|
 |
|
Öljynlämmön (TRAN) sensorin pulttikiinnitys
Attachment bolt for engine oil temp. sensor (TRAN) |
|
|
|
|
|
|
|
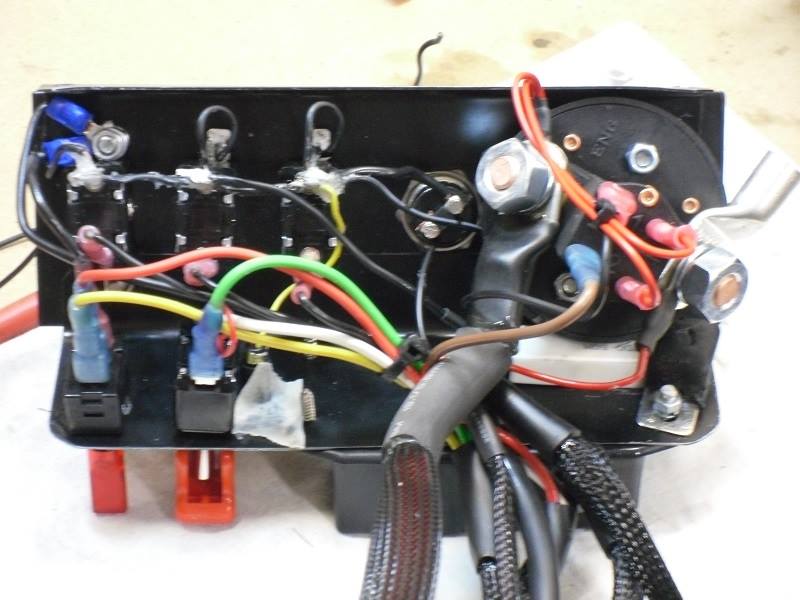
Releet
Keulalla oli ennestään Lucaksen sumuvalot ja EVO3:een tuli laitettua
lisäksi lisäkaukovalotkin. Releitä varten rakensin oman telineen
pellistä ja pulverimaalasin keltaiseksi, jotta erottuu varmasti pimeästä
konehuoneesta. Lisävalojen releiden lisäksi siirsin Kenlow:nkin releen
samaan telineeseen niin ovat kaikki releet samassa paikassa. Samalla
Kenlow:n oma sulake poistui, kun sen sai kytkettyä lisäsulakerasian kautta.
|
|
Relays
I already has fog lights installed but added also Lucas style spot lamps
in the front. As I didn't have to care anymore for originality, I
changed the Lucas relay to modern dual circuit relays with built-in fuses.
The relays and the extra fuse box are installed in a DIY panel which
conceals quite neatly all the wiring looms. The Kenlow fan's
relay was originally near the radiator but moved it to this panel as this
simplified radically the wiring.
|
|
|
|
 |
|
|
|
Ylimääräiset johdot
Takakonttiin tuli vedettyä kerralla perävaunukytkennässä käytettyä 7 x
1.5 kaapelia. Vain kolmelle on tässä vaiheessa käyttöä, mutta
onpahan varalla valmiiksi neljä piuhaa, jos EVO4:ssa haluaa lisää
sähkölaitteita auton perään. Kauitinkaapelitkin tuli vedettyä taakse.
|
|
Supplemental wires Is is very difficult to install additional wires
going to the boot as you have to remove a lot of trim panels to do so.
This time I decided to install a 7x1.5mm extra loom in addition to the
standard loom. At thís moment only three wires of the seven are
in use but you never know, what you will need in the future. I
also installed speaker cables to the rear. |
|
|
|
 |
|
|
|
Hyvästi Mr. Lucas Olin kytkenyt
vaihtovirtalaturista tulevat piuhat Lucaksen jännitteensäätäjään, vaikka
sitä ei tarvita enää. Hetken piuhaviidakkoa katseltuani, otin
peltisakset käteen ja jäljelle ei jäänyt kovinkaan montaa johtoa.
Lopputulos on siistimpi ja jopa turvallisempi kuin alkuperäinen.
Vilkkurelekin on nyt vakiomallinen ja kestää tehoja enemmän kuin
alkuperäinen.
4-sulkakkeinen rasia korvaa toiminnallisesti alkuperäisen 2-sulakkeisen
version. Nyt jopa valot ovat sulakkeen takana, mitä ei ole tehty
alkuperäisessä kytkentäkaaviossa. |
|
Goodbye to Mr. Lucas I had connected the
wires from the alternator to the Lucas control box even it was not needed
anymore. After looking at the wiring mess for a while, I decided
to cut off all unnecessary ones. Not too many wires are actually
needed ! I even changed the indicator relay to a modern one.
The four fuse fusebox replaces the original two fuse unit. Now even
the lights are fused which is not case when using original wiring scheme!
|
|
|
|
Ennen radikaaleja muutoksia
Before radical modifications |
|
|
|
Lopullinen kytkentäratkaisu
Final connections
|
|
|
|
Lopputuloksena johtojen ja johtosarjojen uudelleen sijoituksesta, näyttää
rintapelti nyt melko autiolta. Huomaa paksu
johtonippu, joka tulee oikeanpuoleisen ohjausakselin reiästä! Aiemmin
rintapellin kautta tulleet johdot tulevat nyt tätä kautta.
Ne tulevat kaikki moottorille. Startti on edelleen vaijerikäyttöinen,
mutta rele on nyt auton sisällä! |
|
As a end result the engine bay looks quite empty as all the wirings and
wiring looms are relocated.
Note the thick sleeved cables coming from the right hand steering axle hole.
They will be connected to the engine. The starter relay is still the original
wire operated one but is located in the cockpit! |
|
|
|
Huoltoluukku Kuten kuvasta näkyy on akun takana ollut pikimattoa (alusta
alkaen). Olen tätä ihmetellyt ja päätinkin poistaa sen
'epäilyttävänä'. Aivan oikein: ruostunutta peltiä takana!
Edellinen omistaja ei ollut jaksanut hitsata ruostuneita reikiä vaan
mättänyt pikimaton peitoksi. |
|
Maintenance latch As you can see from the photo above the bulkhead behing the
battery is covere with bitumen felt. It has been there since I got the car.
I always have had suspisions, why the previous owner had put it.
Couldn't help myself and removed it and quessed right: rusted panel behing
it! |
|
|
|
Irtileikattu ruostunut pelti akun takaa.
Piece of rusted panel cut off behind the battery tray.
|
Harvinainen näky eli kojelauta takaa katsottuna!
A rare view: rear of the dashboard! |
|
|
|
Aluksi ajattelin hitsata tilalle uuden pellin, mutta sitten oivalsin
tehneeni kätevän huoltoakon. Nyt kojelaudan takana oleviin
johdotuksiin pääsee ensi kertaa todella helposti käsiksi. Täytyy
pokata vielä pellistä aukon peitteeksi ruuvattava kansi. |
|
At first I thought or welding a new panel to the cutted hole but then
realized that I had made an excellent inspection hole. Now the rear of
the dashboard is easy to reach which helps a lot when doing electical
connections behind the dash. Now I must make a cover that will be
screwed in place. |
|
|
|
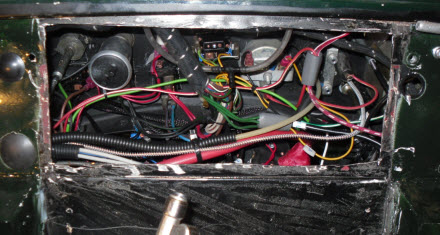
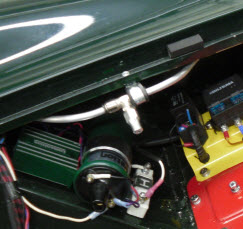
Konehuoneen johdotukset Moottorille menevät
johdot on asennettu panssariputkiin ja kaikista liitynnöistä on pyritty
tekemään vedenpitäviä. Kuvassa näkyy virranjakajalle Ignitronicin
boxista tuleva johto, johon on vaihdettu vedenpitävä jatkoliitin.
Vakiona oleva liitin on täysin suojaamaton. |
|
Engine bay wirings All the wirings that go to
the engine are protected by a tube and all connections are made waterproof
by special connectors. In the picture you can see the wires coming
from the distributor and a waterproof connecter installed. This will
connect to the Ignitronic box. |
|
|
|
 |
|
|
|
|
|
|
|
Lämmityslaite Aluksi ajattelin poistaa
koko Smithisin lämmityslaitteen. Olin jo
virittelemässä 12V sähkövastuksiin perustuvaa versiota, kun totestin homman
olevan liian työlään. alkuperäinen lämmityskenno pääsee
takaisin paikalleen ja loppujen lopuksi myös Smithisin puhallinkin.
|
|
Heater/Demister At first I thought on removing the
Smiths heater completely from the car and had plans of a replacement system
based on ceramic 12 V heater elements and a duct fan. This turned out
to be very laboursome to do and decided to put back at least the Smiths
heater element and fan. |
|
|
|
 |
|
|
|
|
|
|
|
|
|
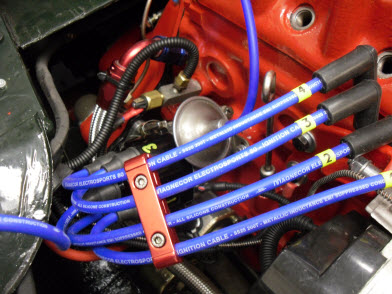
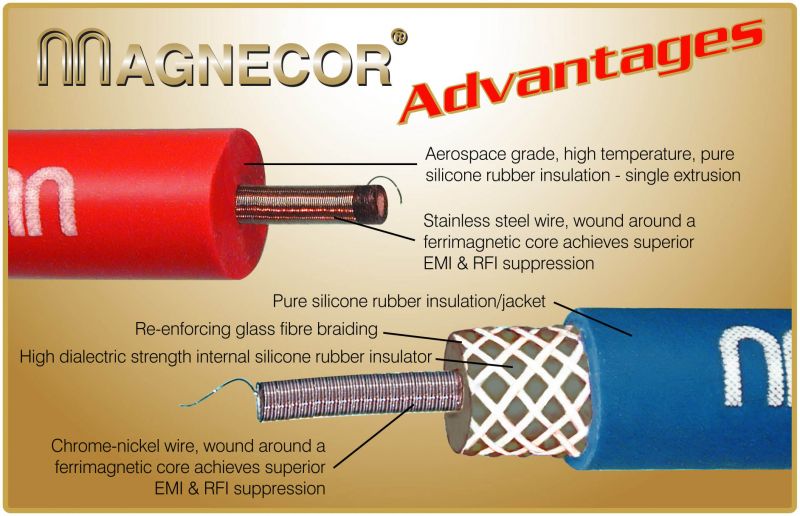
Sytytyskaapelit
Jo EVO2:ssa oli silikoniset tuning kaapelit, mutta niiden laatu oli aivan
surkea. Erityisesti tulpan hatut olivat niin huonot, että eivät
pysyneet kiinni tulipissa pienessäkään tärinässä. Pitkällisen etsinnän
jälkeen löysin englantilaisen
Magnecor-firman,
joka tekee merkkikohtaisia kaapelisarjoja kilpakäyttöön ja niiden laatu
on äärimmäisen hyvä. En ole koskaan nähnyt parempia kaapeleita
kuin
A Series Spares nettikaupasta hankkimani Electrosports 80 kaapelit!!
Tässä linkki valmistajan sivuilla oleviin
kaapelin spekseihin (PDF) ...
Ainoastaan tuo punainen kaapelien niputtaja ei kuulunut sarjaan - on
Biltemasta ...
|
|
Ignition Leads The EVO2 had already
relatively good silicon ignition leads but the quality of them did not
satisfy me. Specially the spark plug caps were extremely poor.
After looking for the best cables available I ended up to
Macnecor
Electrosports 80 high performance leads. They had a set made for
Midget and the high quality is something you very rarely see! I
obtained the cables from
A Series Spares (UK).
Here is the link to the
cable specifications (PDF) ...
The red cable separator is my own and not included in the kit. |
|
|
|
  |
|
|
|
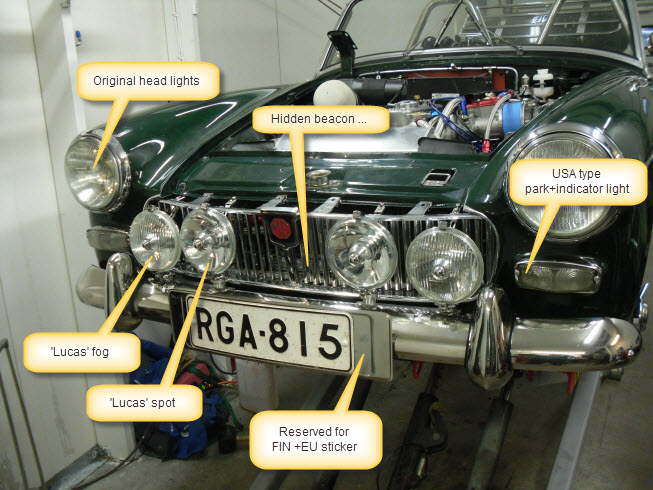
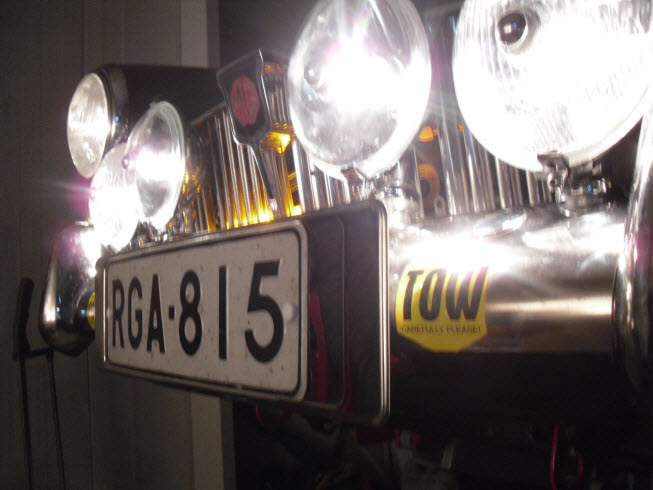
Valot
Keulaan tuli lisätty Lucas-tyyliset apukaukovalot, vaikka ne eivät kovin
laadukkaat olekaan. Ovat samaa sarjaa kuin aiemmin olleet sumuvalot.
Näiden lisävalojen suurin ongelma on todella surkea liityntätapa polttimoon.
Kontaktipinnat tuleekin tarkistaa huolellisesti ja itse rasvasin ne ja
liittimet vedenkestävällä vaseliinilla. Erityisen tarkkana tulee
olla plussakaapelin kanssa, koska sen Lucas-liitin lähestulkoon osuu lampun
runkoon.
Tuo 'hidden beacon' on 6-ledinen keltainen varoitusvalo ja sille löytyi
hyvä paikka maskin takaa. Ikävä kyllä sitä ei saanut sinisillää tai
punaisilla ledeillä :)
Rekisterikilpi, joka sijaitsi ennen puskurin alla, piti siirtää puskurin
eteen, jotta ilma pääsee syyläreille etuhelmaan tekemästäni lisäritilästä.
Kilven taustana on kuvassa isommalle EU-kilvelle tarkoitettu krominen levy.
Täytyy tehdä itse pienempi ja samalla taivuttaa kilpeä hieman
taittuvaksi.
Tässä Youtube-kanavani videolinkit pimeässä kuvattuihin valoihin:
Etuvalot
Takavalot
Sisävalot (toteutus kesken)
|
|
Lights TBT |
|
|
|
 |
|
|
|
|
|
|
 |
|
|
|
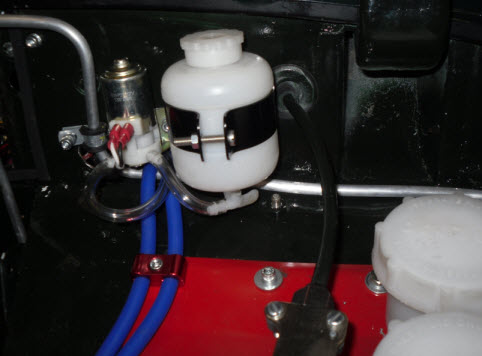
Pissipoika
Aiempi pissipoika käytti autenttista isoa säiliötä, joka vei valtavasti
tilaa konehuoneessa. Olen tarvinnut lasinpesintä kait pari kertaa
viimeisen viiden vuoden aikana ja päätin toteuttaa version, joka tyydyttää
tarpeeni ja katsastusmääräykset. Harvassa autossa on Lockeheedin
pissipojannestesäiliö :) |
|
Screen wascher TBT |
|
|
|
 |
|
|
|
|
|
|
|
|
|
|
|
|
|
|
|
|
|
|
|
|
|
|
Alusta
|
|
Suspension
|
|
|
|
Etujousitus
Etupään jousitus ja iskunvaimennus toimivat mainiosti, sillä EVO2
vaiheessa sinne tuli asennettua FrontLine:n valmistama konversiosarja
kaasuiskareineen ja madallettuine jousineen. Jotain
epäjohdonmukaista auton ohjautumisessa vielä on, sillä rajuissa mutkissa
auto lähtee nelipyöräluisuun. Eturenkaista päätellen eturipustukseen
pitäisi saada camberia enemmän negatiiviseksi eli pyöräkulmaa sisäänpäin?
Ohjautumisen ongelma voi kylläkin johtua myös takajousituksessa olleesta
asennusvirheestä eli toistaiseksi jätän etupään ennalleen.
2014 reissun aikanahan vasemman puoleinen pyörän ripustus petti
ylätukivarren kiinnitysmutterin irrottua. EVO3:ssa varmistin
myös kriittiset Nylock-mutterikin hiussokalla. Tämä vaati reiän
poraamista mutterin ja pultin lävitse eli ei ole kovin hankala homma tehdä.
Etuiskarien alakiinnityskin voisi olla hieman ulompana, koska nyt iskari
hankaa koriin. Samalla vaimennuksen geometriakin hieman paranisi.
Homma vaatisi koko jousituksen purkamista ja alapannun uudelleenhitsauksia
ja siirrän sen EVO 3.1 vaiheeseen ...
Vakaajatangon kumit ovat nyt poly-versiot. Alkuperäiset kumiset
eivät kauaa kestäneet. Eteen tuli asennettua toinenkin hinaussilmukka, jos
vaikka joutuu vetelemään muita autoja pois ojasta.
|
|
Front Suspension
The front suspension and the dampers worked just fine as I had uprated them
into Frontline versions already to the EVO2 version. There is
something wrong with the drivability in tight corners and the car tends
first to push on and the spins in a four wheel slide. The (very
worn) front tyres indicate that the camber should be more negative than is
now. This handling problem can also be caused by the mistakes I
had made in the rear suspension modifications.During the famous 2014 tour
the front suspension's top trunnion bolt blew away causing the
suspension to bend under the car. In EVO3 this is no possible anymore
as all the nuts are secured with a split pin even being nylock nuts.
The front dampers could have been installed a little further outwards as
now the damper touches the car body. This modification would be
a immense job as the whole suspension would have to be taken off and the
bottom brackets rewelded. |
|
|
|
 |
|
 |
|
|
|
Polypro puslat/bushes
|
|
Näin tapahtui kesällä 2014, mutta eipä enää!
This is what happened in summer 2014. Never again! |
|
|
|
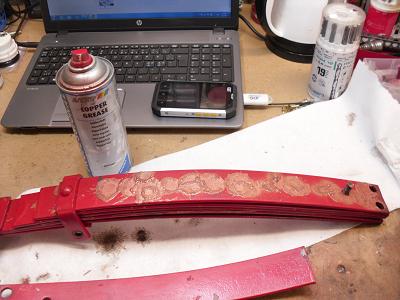
Takajousitus
Stupid is stupid does ... eli mokasin oikein urakalla EVO2-versiossa, kun
virittelin lehtijousia madaltaakseni jousitusta. Olin poistanut
kolme lehteä jättäen siten raon
pakan tuen ja sen alla olevan lehden väliin. Tämän johdosta
jousitus ei enää ollut 'progressiivinen' vaan sopivalla kuormituksella
jousitus antoi kerralla periksi. Jäljistä päätellen jousitus on
pohjannut oikein kunnolla kovassa ajossa - erityisesti mutkissa!
Nöyränä poikana täytyi palauttaa lehtipakka alkuperäiseen asuunsa ja
toivotaan, että tämä auttaa myös perän käyttäytymiseen äärioloissa.
Lehtijousethan ovat Mossin kauppaamia 'uprated' versioita. En
kylläkään huomaa mitään muuta 'uprated' kuin sen, että ovat
erittäin
huonolaatuiset!. Jo EVO2 vaiheessa totesin, että pakan
kiinnityssilmukat eivät ole täysin pyöreät ja nyt 10,000 km ajon jälkeen
puslista näkee, että ne alkavat muotoutua toispuoleisiksi.
Lehtien kasauksessa käytin jokaisen lehden välissä kuparipastaa suojaamaan
lehtiä ja samalla parantamaan niiden liukumista toisiinsa nähden.
|
|
Rear suspension
Stupid is stupid does: I made a gigantic mistake while making the EVO2
version. I tried to adjust the rear springs (quarter elliptic leafs)
by removing three leafs. Doing this left a cap between the upper leafs
and the guiding bushes. This in turn caused the spring not to function
progressively anymore. Instead under heavier load the suspension
bottomed totally. I noticed this not until I disassembled the
whole rear suspension for the rear axle uprating. Well, I had to return
the spring leafs to their original locations. Hopefully this solves
also the handling inconsistancy in tight cornering. The springs are
uprated versions bought from Moss. All uprate I could spot, is
the extremely poor quality of them. Already during EVO2 I noticed that
the bush eylets are not round and now after 6,000 miles the bushes are
getting ovat shaped. I
used copper grease between all the blades to protect them from rusting and
for smoother operation. |
|
|
|
 |
|
|
|
|
|
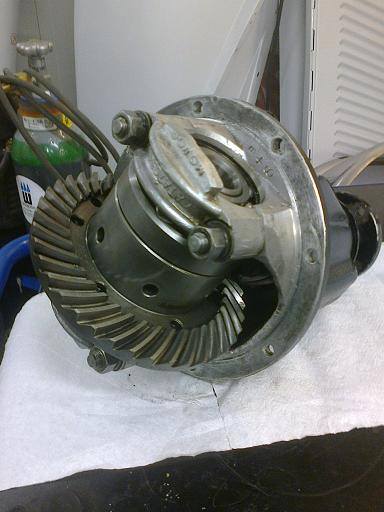
Perän lukko Tehoja Midgetissä on sen verran, että sopivan liukkaalla pinnalla perä
sutii kunnolla. Mutkissa ajamisen tämä sutiminen tekee hankalaksi ja
päätinkin asentaa nykyiseen perään lukon. Kovin rajua lukkoa en
kuitenkaan halunnut, sillä autolla olisi tarkoitus kyetä ajamaan
'normaalistikin' ja päädyin lopulta nk. limited slip-versioon.
Midgettiini sopivan version löysin
Quaife:lta Englannista itkettävään hintaan. Lukon virallinen
nimi on vaikuttava: 'A series Axle Quaife ATB Helical LSD Differential'.
Toiminta perustuu hammaspyöriin eikä levyihin kuten rajummissa lukoissa.
Asennus oli tosi helppoa ja sujui perän purkamisen jälkeen alle tunnissa
säätöineen.
|
|
Differential lock The stage2 engine gives so much power that the
rear tyres tend to slick on slippy surfaces. This slipping makes
driving a bit difficult on curvy roads and I decided to install a diff lock
to the rear axle. I didn't want any racing version and ended up
to to limited slip version. I found a good version from
Quaife UK. The official name is very impressive:
'A series Axle Quaife ATB Helical LSD Differential'.
Installation was very easy (if you ever have dismantled a differential)
and even the old adjusting shims could be used.- |
|
|
|

Vasemmalla vanha ja oikealla uusi tasauspyörästö
The original diff on left and the new on the right |
 |
|
|
|
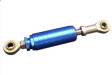
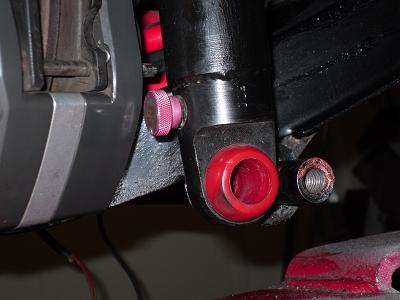
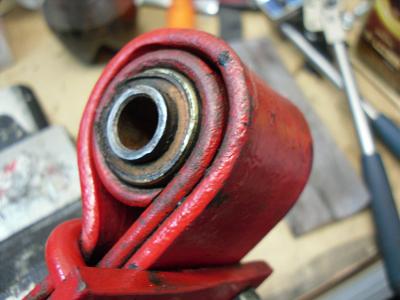
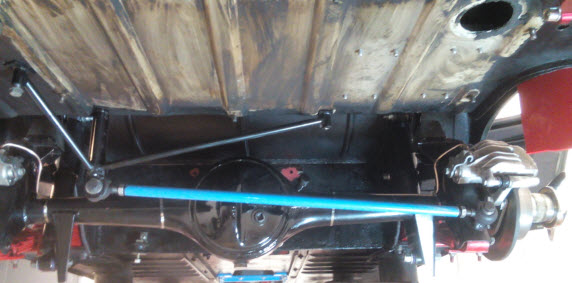
Panhard-tanko
Jo EVO1 vaiheessa asensin taka-akseliin Frontline:n Panhard-tangon.
Sen avusta ajettavuudessa en ole vielä täysin varma, koska takajousituksen
mokani on 'syönyt' sen mahdollisesti mukana tulevat hyödyt taka-akselin
sivuttaisliikkeen estämisessä.
Tangon kiinnityspistettä tukikehikkoon tuli hieman muokattua, jotta
tangon saa helpommin poistetua. |
|
Panhard rod The Frontline's Panhard rod kit
was installed already to EVO1 stage. The benefits of it are not clear
yet as the rear springs were wrongly installed by some idiot. Now that
the rear suspension is rebuilt, it must be reinstalled too. Rod's fixing
point to the frame has been modified in order to be able to remove it
easier. |
|
|
|
  |
|
|
|
Pinnapyörien navat Taka-akselin navat olivat
sen verran kuluneet, että päätin uusia ne. Ovat erittäin helppo
vaihtaa TAI sitten ei. Toinen napa lähti vetoakselista muutamalla
moskan iskulla, mutta se toinen vaatikin pidemmän kaavan mukaiset
toimenpiteet. Se ei irronnut, vaikka hehkutti tulipunaiseksi ja ainoaksi
vaihtoehdoksi jäi halkaista se rälläkällä.
Tilasin uudet navat UK:sta ja epähuomiossa en tilausvaiheessa tarkistanut,
millä kierteellä ne olivat. Navat saatuani totesin, että pieleeni
meni: olivat 8 TPI kun vanhassa Midgetissä pitäisi olla 12 TPI. Ei
muuta kuin tilaamaan uudet 8 TPI:n siipimutterit. |
|
Wire wheel hubs The rear wheel hubs were
quite worn and I decided yo change them to new ones. They are very
easy to change OR NOT. The other hub came out easily from the
shaft but the other one requires all tricks available. Heating
the hub and then using a sledge didn't move the hub at all. Final
solution was to cut a slot to the hub with an angle grinder.
I ordered the new hubs from UK and didn't remember to check which threads
they had. Of course I received the wrong 8 TPI version used in newer
Midgets. Had to order new wing nuts with the same 8 TPI threading. |
|
|
|
Ei hievahtanutkaan ...
Didn't move even after this ...
|
|
Myydään: hieman kulunut pyörän napa
(12 TPI) ...
For sale: Almost new rear wheel hub (12 TPI) ... |
|
|
|
Alkuun / Top
|
|
|
|
Jarrut
Jo EVO2:ssa autossa oli huipputehokkaat jarrut: edessä 4-mäntäiset
FrontLine:n jarrusylinterit + 9" levy ja taakse vaihdettu rumpujen tilalle
levyjarrut. Ongelmaksi jäi jarrujärjestelmän sydän eli
pääsylinteri ja se että jarrut olivat 1-piiriset.MG:ssä on
alkujaan järjestelmä on varsin
turvaton, koska jarrumäntä sekä kytkinmäntä saavat nesteensä samasta
säiliöstä. Jos neste loppuu, eivät toimi jarrut eikä kytkintään. |
|
Brakes The EVO2 version already had very powerful brakes thanks to FrontLine brake
conversion kits. The front disks were 9" with 4-pot cylinders and the
rear brakes converted to disk brakes.
One MAJOR safety problem remained: the hydraulic system has only one reservoir
(brakes+clutch) and the brakes are in one circuit. If the
hydraulic fluid runs out you will lose both all the brakes and also the
clutch operating. |
|
|
|
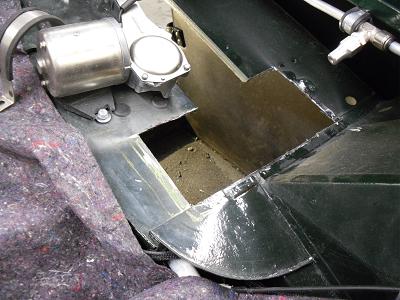
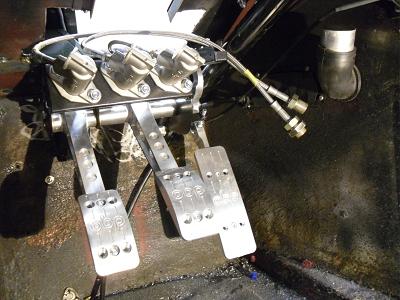
Polkimisto
Pitkällisen tutkinnan jälkeen päätin kokeilla päivittää koko
poljinasetelman (pedal box) racing versioon, jossa kytkimelle ja etu- ja
takajarruille on omat sylinterinsä ja neste-
säiliönsä. Kunnollinen versio on itkettävän hintainen, mutta tuleehan
sitten kerralla hyvä. Pedal boxeista löytyy eri variaatioita
riippuen kiinnitystavasta. Midgetissä ainoa mahdollisuus on
käytännössä nk. riippuva kiiniitys. Björk Motorssportin suosituksesta
päädyin englantilaiseen OBP ProRace V2-versioon.
Pedal boxi ei sitten mahtunutkaan ohjaamon puolelle eli piti sittenkin
leikata aukko konehuoneen puolelle. Aukkoon piti sitten hitsata
kiinnitysraudat polkimistolle sekä suojapellille - hieman suurempi urakka
siis! Kuvassa olevaa aukkoa pitä vieläkin suurentaa eli pyyhkijän
moottorille piti keksiä uusi paikka.
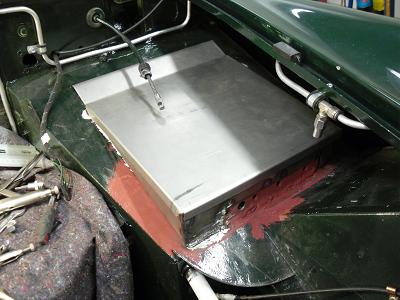
Peltinen kansi tulee peittämään kokonaan polkimiston ja kanteen tulee
paikat kolmelle nestesäiliölle sekä pyyhkijänmoottorille. Etureunasta
lähteekin sitten iso kasa vaijereita ja johtoja. Peltisestä
kannesta piti tehdä kolme versiota ennenkuin se onnistui täysin.
|
|
Pedal Box
After a long consideration I decided to uprate the whole pedal box to a
racing version having independent fluid circuits for front and rear brakes
and also for the clutch. As a bonus I selected a version that has a
sturdy throttle pedal in the same unit. Main problem in a Midget
is, that there is very limited space inside the cockpit. Even I
chose a hanging version, there was not enough space for the pedals.
I ended up to use maybe the best option for a pedal box: OBP ProRace V2
(UK).
Intstallation of the pedal box was a nightmare and don't recommend it to
anyone not having a proper repair shop and tools. Easiest part was
cutting a large whole for the pedal set. Then I had to weld fixing
brackets for is and a frame with a top panel to cover the whole setup.
Three versions of the top panel was needed before I got it right.
As a bonus, I can now reroute all wires from the dashboard to go through
the front of the pedal box cover. This will make the engine bay
much neater and easier to keep clean.
|
|
|
|
 |
|
 |
|
|
|
 |
|
 |
|
|
|
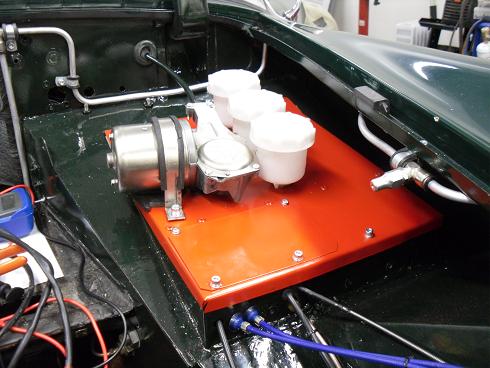
Pedalboxin kansi valmiina
The pedal box lid finished
|
|
|
|
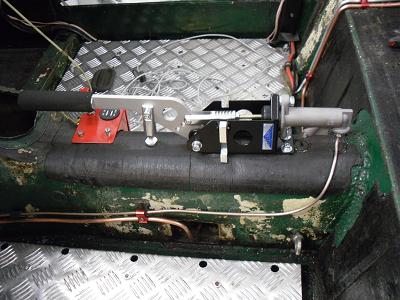
Jarrubalanssin säätö Balanssin säätöä varten
pedal boxissa on valmiina säätötanko etu- ja takajarrusylinterien välissä.
Tarvitsee ainoastaan kytkeä tähän säätövaijeri, niin balanssia voi säätää
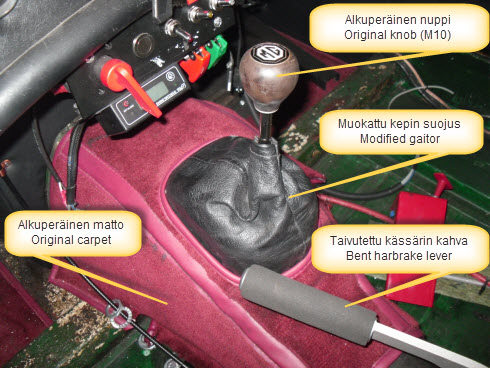
kesken ajamisen. Asensin säätönupin vaihdekepin tienoille
kardaanitunnelin kylkeen. HUOM: Tämä ei ole laillista yleisessä
liikenteessä ajettaessa. Jarrubalanssin säätö ajon aikana ei ole
sallittua. Onneksi kysyin asiaa katsastusmieheltä. Täytyy siis
'poistaa' säätövaijeri kokonaan, jotta menee katsastuksesta lävitse ... |
|
Adjusting brake balance The pedal box comes
with a bias-bar installed between the front and rear cylinders. You just need
to install a adjusting wire to this bar and you can adjust the brake balance
during driving. I placed the adjusting knob near the gear stick.
NOTE: Check your local regulations whether a brake balance adjusting
system is road legal in your country. In Finland MOT regulations do
not approve adjusting the brake balance while driving on public roads. |
|
|
|
 |
|
|
|
Käsijarru Alkuperäinen käsijarru on hieman ahtaassa paikassa penkin
ja kardaanitunnelin välissä. Ajotyylini suosii käsijarrua
muussakin kuin pysäköinnissä ... ja päätin päivittää sen hydrauliseksi
'drifting'-versioksi. Käsijarrun sylinteri on takajarrupiirin putken
välissä eli se ei vaadi omaa piiriään/putkiaan.
Käsijarrun lukituksen saa pois päältä kääntämällä kuvassa näkyvä linkku
sivuun. Tarkoitus on kylläkin tehdä itse parempi ratkaisu tähän.
Päivitys: Koska Frontlinen Ford-laatikon vaihdekeppi tuleekin lähes 50
mm taaemmaksi kuin alkuperäinen, pitää käsijarrun kahva taivuttaa pois
tieltä. Itseasiassa kuskin puolelle kaareiksi taivutettuna siitä
tulee helpompi käyttää? HUOM: Katsastusmies sanoi
tänään, että hydraulinen käsijarru on laiton katuautossa. Käsijarrun
pitää toimia, erillään muusta jarrujärjestelmästä. Täytyy palauttaa
vanha mekaaninen käsijarru vanhalle paikalleen niin onpi sittten kaksi
käsijarrua :) |
|
Handbrake The original handbrake handle is in a very tight space
between the race seats and the propshaft tunnel. My driving style
favours using the handbrake in tight turns and the original location was
quite problematic. I decided to uprate the hand brake to a
hydraulic version as they have a nice 'drifting' option: you can
temporarly remove the locking feature from the handbrake lever. This
'chinese' solution is not very handy and I have plans to make my own
solution for the locking mechanism. Update: As the Frontline's 5-speed
gearbox conversion causes the gear stick to be moved 50 mm rearwards, I must
bend the handbrake's handle to give room for it. Actually the handle
will be more conveniently located when bent towards the driver (=left).
NOTE: Check your local regulations whether hydraulic handbrakes are
street legal. |
|
|
|
Huom: Auto verhoillaan normaaleilla matoilla eli putkitukset jäävät
piiloot
Note: The car will have standard carpets and thus all the pipes will be
hidden under them
|
|
|
|
Jarruputkitus Kaikki jarruputket piti uusia, koska etu- ja
takajarrut ovat omissä piireissään. Alkuperäisiä reittejä en edes
harkinnut vaan putket kulkevat 'parasta mahdollista' reittiä.
Putkien tekotalkoisiin sain alan ammattilaisen! Eki on asentanut
prosessiteollisuuden putkia koko ikänsä ja työkalut ovat sen mukaiset.
Monimutkaisinkin putki syntyi mittaamalla ja penkissä taivuttamalla.
Ja ne mittaukset: esimerkkinä 92 mm suoraa ja sitten 42 asteen kulma.
Jarruvalojen kytkimen paikkakin vaihtui vasemmalla puolelle ja Eki
taiteili melko ahtaaseen paikaan siistit putket (Eki kohteliaasti heitti
itse tekemäni version roskiin) pelkästään putken taivuttimella.
Näyttää helpolta, mutta ongelma onkin yleensä, mitä kautta putken vetää.
|
|
Brake pipes All the pipes had to be re-routed as the front and rear
brakes are now in their own circuits. I didn't even consider using the
original pipe routes but instead used the principle of 'best possible' - and
of course the safest one.
I had a great priviledge of having a retired expert to assist me in
making the pipes. 'Eki' has installed pipes and tubes whole his life
in processing industry and had tools that I could never afford to buy.
Eki made all the pipes by measuring and then bending them in the vice.
Typical measuring was something like 92mm straight and the 42 degree angle.
Due to the rerouting the brake switch was moved from the right hand side
to the left.
As an example Eki disgarded the tube I
had made from this junction to the left brakes. Eki's version is
totally made with the tube bender(s) and not by partially bending by hand as I had
done.
|
|
|
|
 |
|
 |
|
|
|
Kytkimen putkitus Pedalboxin myötä myös
kytkimen putkitus piti tehdä uusiksi. Alkuperäinen putken reitti on
hämmästyttävän monimutkainen ja laiskana vedin putken täysin uudella
reitillä ja tavalla. Vastaava ratkaisu on vakiona mm. Jaguar MK2:ssa,
jonka entisöin jokin vuosi sitten. Joustava letku on kiinnitetty samaan
rautaan, jonka tein moottorin vaimennustankoa varten.
Apusylinterin ilmausruuvi on vihoviimeisessä paikassa eikä siihen pääse
käsiksi kuin auton sisällä olevasta tarkistusluukusta. Suunnitelmissa
onkin putkittaa sekin helpompaan paikkaan. |
|
Clutch piping The clutch piping had to be
rerouted due to the pedal box. The original route from the master
cylinder to the slave cylinder is very long as have never understood why it
has been done this way. Being a lazy man, I decided to use the
same solution as Jaguar had done in the MK2 model. The flexible hose
is connected to the bracket I made for the engine damper.
The bleeding screw in the slave cylinder is extremely difficult to
operate. Only way to bleed the cylinder is through the inspection hole
in the right hand side footwell. I'm planning to relocate the bleeding
screw by using a tube or short hose. |
|
|
|
 |
|
Huom: keskimmäinen pultti on turha - siihen tulee lohkossa oleva
ohjaustappi!
Note: The center bolt is not usable. Engine's guide bush comes
there. |
|
|
|
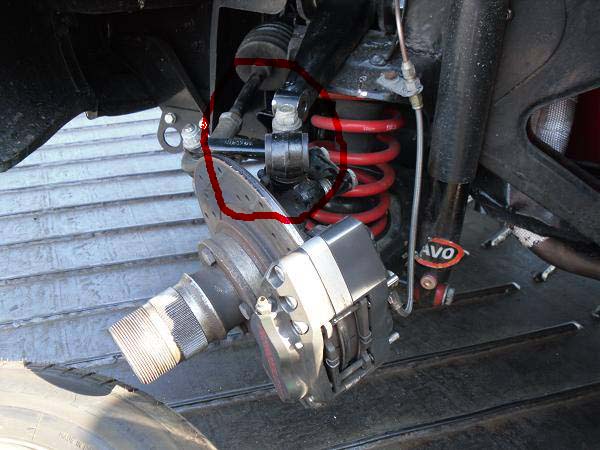
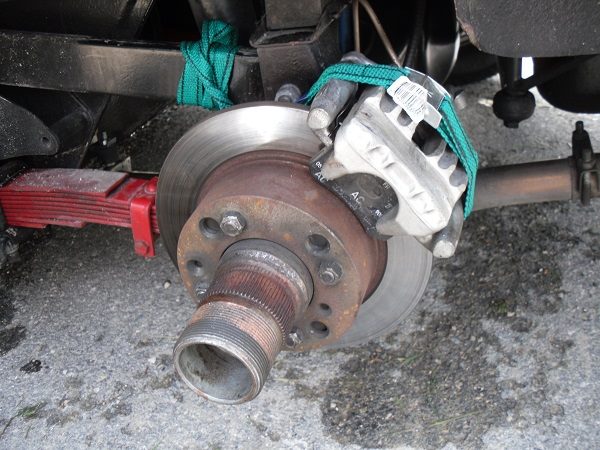
Levyjarrut Takajarrujen satulan kiinnityksen parantaminen on
vieläkin kesken, mutta tästä näkyy asennuksen perusongelma:
kiinnityspultiksi ei saa mahtumaan riittävän pitkää. Muutin jo
kiinnityksen käyttämään M10 pultteja eli satulassa on muunnosholkitus
ja kiinnityslevyssä M10 kierre helicoil:lla. Konversiosarjan valmistaja
FrontLine ei edes myöntänyt kiinnitysongelmaa, vaikka kaikki ulkopuolisetkin
totesivat sen yhdellä silmäyksellä.
Etujarrulevyjen (Frontline...) suhteen perusongelma on se, että 1" ylikoon takia ne
osuvat raide-tangon päihin ohjauksen ääriasennoissa. Täytyi hieman
rälläköidä lisää tilaa levylle, niin nuo suojakumit eivät rikkoudu.
Huomaa molemmissa kuvissa säätöshimmien käyttäminen jarrusatulan
suuntaamisessa! |
|
Disk brakes The rear disc fixing improvent is still under process
but in the picture you can see the main
problem: there is not enough space for long bolts. I have already
modified the conversion kit to accept M10 bolts by re-threading the adaptor
place with Helicoils.
The Frontline front disc conversion set has also a minor problem and the bigger
disc (9") is a little too large and touches the track rod end's rubber
gaiter. Well, this required some more grinding and additional spacers
to get solved. Note the use of adjusting shims to get the brake calibers
properly aligned! |
|
|
|
Takajarrut / Rear brakes |
|

Etujarrut / Front brakes |
|
|
|
EVO2: Kesällä 2014 lähti jarrusatula vauhdissa
irti - eipä lähde enää!
EVO2:
In summer 2014 the brake caliber bolts flew off - never again ! |
|
|
|
|
|
Alkuun / Top
|
|
|
|
Jäähdytys
Ongelmat
Jäähdytyksen kanssa oli suuria ongelmia kesän 2014 Euroopan turneella.
Kovassa ajossa niin veden kuin öljynkin lämmöt nousivat aivan tappiinsa.
Suurin ongelmista oli öljyn lämpötilan nousu, vaikka autossa oliin Mocalin
öljynlauhdutin (13-rivinen). 13-rivinen riittää hyvin nopeaan
maantieajoon mutta omaan 'rallityyliini' ei.
Rakenteelliset
muutokset
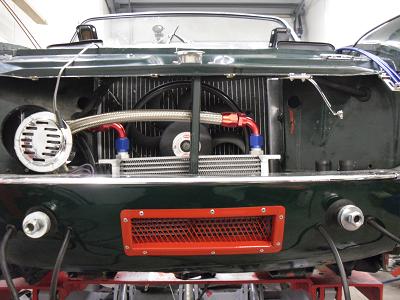
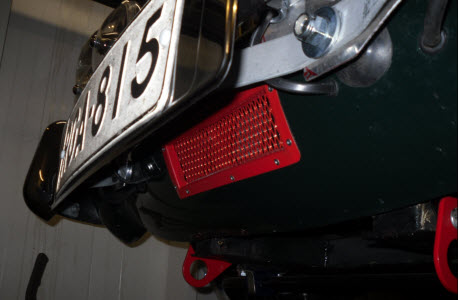
Saadakseni öljyn (ja veden) lämmöt alemmaksi, piti minun tehdä radikaaleja ratkaisuja etuhelmaan.
Pitkällisen harkinnan jälkeen ei auttanut kuin rälläköidä
tuuletusreikä keulaan ja
tehdä provosoivan punainen suojamaski reikään. Maskin yläosa jää kylläkin
puskurin taakse osittain piiloon.
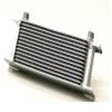
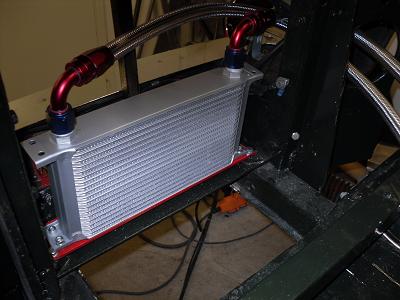
Öljynlauhdutin
Aiemmin 13-rivinen Mocalin lauhdutin oli syylärin edessä ja tämä oli huono
ratkaisu, koska lauhdutin blokkasi ilman
virtauksen Kenlow:n puhaltimelle. Uudessa versiossa lauhdutin on
vaihdettu 19-riviseksi (ei Mocal) ja tiputettu alaspäin poistamalla alapuolella olleet alkuperäiset äänitorvet.
Letkut on tehty teräspunoksisella AN10 letkulla itse. EVO2:ssa ollutta
Mocalin öljytermostaattia en asentanut, koska tämä yksinkertaisti
huomattavasti putkitusta. Luulin termostaatin lauenneen, koska siinä
oleva 'Waxstat' termostaatti tuhoutuu yli 140°C:ssa. Purin kylläkin
termarin ja testasin sen lämmittämällä sitä kuumailmapuhaltimella
viilapenkissä. Uskomattoman työntövoiman termari tuottaa!
|
|
Cooling Engine cooling was one of the major problems during my long 2014 European
trip. In fast driving the water and oil temperatures were absolutely
too high at high altitudes The main problem was oil temperature even there is a Mocal
13-row oil cooler installed. This should be adequate for fast
road use but my driving seem to be more like rally/racing :)
In order to
get the oil temp under control, radical changes had to be made. An
extra ventilation hole was cut to the front of the car and a much bigger 19
row cooler installed. Previously the cooler was installed in front of the
radiator (and Kenlow fan) thus blocking air flow to the radiator. In
the new solution the oil cooler has been dropped down by removing the
original horns.
After long considering I cut a hole in the front for the oil cooler
cooling. The red (!) grill mesh I made myself and looks quite
aggressive. However, it will be partially hidden behind the front
bumper.
The oil hoses will be done with AN10 braided hose by myself. The
Mocal oil cooler thermostat from EVO2 will not be installed anymore to
simplify connections.
|
|
|
|
Mittaa kolmasti - leikkaa kerran ...
Measure three times - cut once ... |
|
Huomaa syylärin alla oleva punainen kiinnityslatta
Note the red DIY attachment bar under the cooler |
|
|
|
 |
|
 |
|
|
|
|
|
|
|
|
|
|
|
|
|
|
|
|
|
|
|
|
|
Alkuun / Top
|
|
|
|
Öljyjärjestelmä
|
|
Oil System |
|
|
|
Stage2 moottorissa on valmiiksi suurtehoöljypumppu eli öljynpaineiden kanssa
ei ole koskaan ollut ongelmia. Ongelmina ovat vuodot sekä korkea öljyn
lämpötila ja se, että öljynsuodatinta ei mahdu irroittamaan ottamatta koko
suodatinrunkoa irti. |
|
The Stage2 engine has already a high volume oil pump installed and I have
ever had any problems with oil pressure itself. The problems are: oil
leaks, oil temperature and the fact that it is impossible to change the oil
filter without removing the whole filter head. |
|
|
|
Kampiakselin tiivistys Mossin kautta hankittu Stage2 moottori oli
vuotanut öljyä kampiakselin päästä jo uutena. Mossin kauppaamat
vaihtemoottorit oli ainakin tuolloin tehnyt Ivor Searley niminen
'suuryritys' ja työn laatu tolkuttoman huonoa. Koneistamoni
ilmaisi tämän asian hieman kauniimmin, kun olivat 2015 alussa purkaneet
moottorin ja mitanneet kaikki osat.
Vuoto-ongelman yritys ratkaista jo vuonna 2014 ennen Euroopan turneetani
asentamalla kampi-
akselin päähän ylimääräisen stefan. Hankin Moss:lta tähän soveltuvan
konversiosarjan, joka sinällään on erittäin hyvälaatuinen. Jostain
kummasta syystä uusi stefa tuhoutui totaalisesti heti kättelyssä lähtiessäni
reissuun.
Syy tuhoutumiseen selvisi, kun purin koneen totaalisesti: vauhtipyörän
ohjausrengas oli puristanut tiivistettä noin 2mm verran kasaan.
Lopputulos näkyy alla olevasta kuvasta. Vauhtipyörän ja kampiakselin
väliin pitää asennusohjeidenkin perusteella laittaa ohut välilevy.
Kitissä ollut välilevy oli kuitenkin niin ohut, että ei riittänyt estämään
edellä esitetty puristumista. Lopullisena ratkaisuna oli sorvata 2 mm pois
vauhtipyörän ohjausrenkaasta. Toivottavasti tämä ratkaisee
vuoto-ongelmat lopullisesti. |
|
Crankshaft sealing The engine had leaked some oil since I got it
from Moss in 2010. Actually the engine is rebuilt and tuned by
Ivor Searley in UK and the quality of their work is far from acceptable.
This was confirmed by the engine shop after they had rebuilt the engine in
the beginning of 2015.
I tried to solve the leaking problem (oil was leaked to the clutch
bell housing from the crankshaft end) by installing an additional seal.
This seal kit is sold by Moss and is of good quality. However, the
seal was totally destroyed after driving just some 50 miles.
I found the reason for this failure after the engine was disassembled:
the flywheel had compressed the seal face by some 2 mm. The end result can
be seen in the picture below. The flywheel must be installed using a
spacer when using this seal kit. However, the spacer in the kit was
far too thin in my case. As a final solution 2 mm were turned off from
the flywheel recess ring. Hopefully this will solve this issue for
good. |
|
|
|
Mossin tiivistesarjan sisältö
Content of the Moss Crankshaft Oil Sealing Kit
|
|
 |
|
|
|
Öljynsuodattimen siirto |
|
Relocating the oil filter |
|
|
|
Nykyinen öljynsuodatin on nykyaikainen patruunasuodatin, joka on kiinni
sovituslaipalla suodattimen 'jalassa'. Muuten hyvä ratkaisu,
mutta sovituslaipan takia Mossin siihen kauppaamaa GFE166 patruunaa ei mahdu
kiertämään pois, koska se on erittäin lähellä runkopalkkia. Vaihto
tapahtuikin irroittamalla koko suodatinjalka. Koska suodattimessa
näkyi pahoja lommoja, päättelin, että se osuu runkopalkkiin, moottorin
hiemankin liikkuessa. Helpoin ratkaisu oli siirtää koko suodatinjalka pois
moottorista käyttämällä Mocalin siirtojalkaa. Alkuperäinen suodatinjalka
korvataan laipalla, johon teen liitynnän AN10 letkulle.
Öljynsuodattimeksi valitsin suurimman,missä on 3/4 UNF kierre ja maalasin
sitten K&N tyyliin valkoiseksi. Jälkikäteen selvisi, että ko.
suodatin on käytössä useassa Audin mallissa.
|
|
The current oil filter is a modern oilfilter attached to the oil engine with
an adaptor. Problem with this is that it is impossible to change the
filter without removing the filter head from the engine. In addition
the oil filter hits the body beam during hard driving. The conversion set is
from Moss and uses GFE166 oil filter. A shorter filter would solve
this problem but then the oil volume would be reduced. Easiest permanent
solution to this problem was to move the oil filter totally away from the
engine block. This can be done by using a remote filter head (e.g.
Mocal), a blanking plate in the engine block and a connection hose.
My EVO3 uses AN10 connectors and braided hoses throughout the oil system.
The oil filter is the biggest version I found having 3/4" UNF thread.
I painted it white a'la K&N. Aferwards I found out that the
filter is used in many Audis. |
|
|
|
 |
|
|
|
|
|
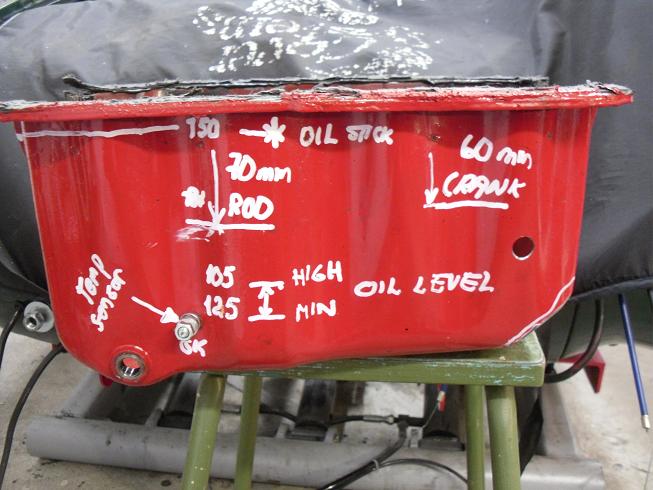
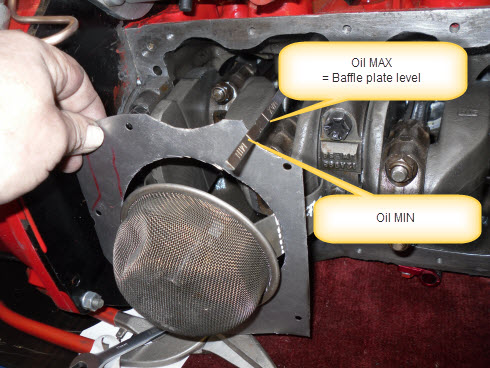
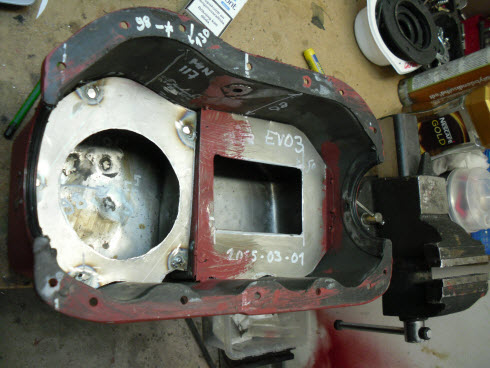
Öljypohjan päivitys
Koneessa oli jo kiinni vakio pohja, kun moottori-laatikko putosivat
lattialle nosturin kaaduttua. Öljypohja vaurioitui niin pahoin, että
oli pakko vaihtaa verstaan nurkasta olleesta Marinan koneesta uusi tilalle.
Samalla päätin hitsata öljypohjaan loiskelevyt, jotta öljy ei karkaa
mutkissa 'pannun' reunoille. Hinta tälle rallisäiliölle kertyi noin 1 €. |
|
Up-rated oil pan The engine had a standard oil
pan when it dropped to the floor when the engine hoist tilted. The pan
got such a deep dent, that I could not be easily fixed.
Instead I dug out a dusted Morris Marina's oil pan from my junk parts and
decided to up-rate it as well. Most laboursome stage was making of
the baffle plates. Total costs of this 'racing pan' were about 1 €. |
|
|
|
Kriittiset mitat ...
Critical measurements ...
|
|
 |
|
|
|
 |
|
 |
|
|
|
Huohotusjärjestelmä
Moottorin huohotuksen toiminta on äärimmäisen tärkeää moottorin kestävyyden
kannalta. EVO2:ssa huohotus oli pelkästään vakiona oleva
huohotinpönttö jakoketjun kopassa. Öljyn täyttökorkissa oli
minimaalinen reikä, josta kait teoriassa huohotus tapahtui.
Viritetyt moottorit aiheuttavat kampikammioon suuren ylipaineen, jonka on
annettava poistua. Kampikammiosta tuleva huohotus sisältää öljysumua, joka
likaa moottorin sekä laskee oktaanilukua, jos se imetään takaisin moottoriin
imuilman mukana. Tehokkaasti huohottava moottori vuotaa vähemmän öljyä kuin
huonosti huohottava
Kisa-autoissa on pakollisena erillinen kerääjäsäiliö ja
sellainen oli jo EVO2:ssa mutta EVO3:een on tulossa parempi versio.Letkut toteutin AN8 letkulla ja liittimillä, vaikka tämä onkin yliampuvaa.
|
|
Engine breathing system Good engine breathing
is essential specially when the engine is tuned. Without proper
breathing there would be overpressure inside the engine. This in turn
would cause oil leaks through the seals. Breathing also gives longer
lifetime for the oil as the vaporized water and other fumes are not mixed to
the oil.
In standard old cars breathing is mostly done by connecting a hose from
the timing chain cover to the inlet manifold. Idea behind this is,
that the oily fumes are burned. This is not very good solution
as the valves and cylinders will be covered with the burnt oil resedues and
this also reduces the fuel octane level.
|
|
|
|
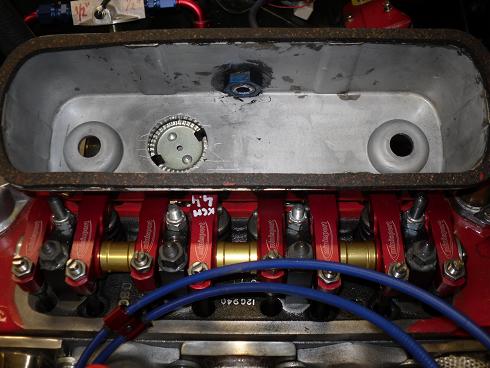
Venttilikopan lävitse tuleva AN8 sovitin.
Olisi voinut käyttää myös hitsattavaaa AL-sovitinta.
Huomaa sijainti keskellä koppaa, koska tällä kohtaa venttiilivivustossa on
sopiva tyhjä kohta.
AN8 adapter in the rocker cover. Could also
have used a weldable AL-adapter.
Note: location is in the center where there is a cap in the rocker
mechanism. |
|

Hitsattu AN8 sovitin öljypohjassa
(pakosarjan puolella).
Welded AN8 adapter in the oil pan (exhaust
side). |
|
|
|
Alkuperäinen putkiliityntä korvattu 3/8"
NPT sovittimella. Teräsvillat poistettu kammiosta!
Original tube outlet replaced with 3/8"
NPT threaded adapter.
Wire 'wool' removed from the chamber! |
|
 |
|
|
|
<kerääjäsäiliö> |
|
<catch tank> |
|
|
|
Alkuun / Top
|
|
|
|
Turvallisuus
|
|
Safety |
|
|
|
Sammutusjärjestelmä 40-vuotisen autojen rakentamishistorian aikana
olen 'polttanut' yhden Escortin totaalisesti ja muutamassa muussa autossa on
syttynyt tulipalo saatu sammumaan sammuttimilla. Voin taata,
että ei ole mukava seisoa vieressä, kun vuosia rakennettu auto palaa poroksi
voimatta tehdä mitään sen estämiseksi!
EVO3:ssa ratkaisin moottoripalon sammutuksen kiinteästi putkitetulla
järjestelmällä. Takakontissa olevasta 6 kg säiliöstä lähtee
alumiiniputki ja konehuoneessa on siihen kytketty neljä kiinteä suuutinta.
Vastaava järjestelmähän on pakollinen ralliautoissa. Järjestelmä
maksaa valmiina settinä vain noin 200€ eli mielestäni kohtuullisen pieni
kustannus mielenrauhasta. Sammuttimen saa laukaistua kahdesta paikasta vetovaijerilla: toinen auton
perässä ja toinen kardaanitunnelin vieressä penkkien välissä.
Kiinteän 6 kg järjestelmän lisäksi autoon tulee ohjaamoon irroitettava 2
kg käsisammutin. Tällä sammuttimella ei kylläkään sammuteta mitään
moottoripaloja (tiedän kokemuksesta), mutta on hyvänä apuna pienempien
palojen sammuttamisessa.
|
|
Fire suppression system During my 40 year history of building cars
I have lost one Escort (Group A) totally due to fire and saved a few ones
from totally burning by use of fire extinguishers. I can assure that
it is not a pleasent moment to look your car you have built several years to
burn down and you can do nothing to stop it.
In EVO3 I solved the basic problem with fixed fire suppression system.
There is a fixed 6 kg tank in the boot and there are four fixed nozzles in
the engine bay connected with aluminium tube to the tank. This
kind of system is mandadotory in race cars. This kind of kit costs
about 200 € which isn't much in my opinion. The system can be activated by trigger cables: one in the rear of the car
and one in the cockpit.
In addition to this fixed 6 kg system I will install a normal 2 kg
fire-extinguisher in the cockpit. This can be used to entinguish
smaller fires. By experience I know that they are quite useless in
bigger fires. |
|
|
|
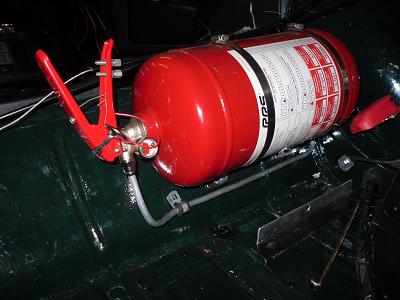
Kiinteä 6 kg säiliö
Fixed 6 kg container |
|
Laukaisijan paneli ohjaamossa
Trigger panel in the cockit |
|
|
|
Yksi neljästä kiinteästä suuttimesta
konehuoneessa
One of the four fixed nozzles in the engine bay |
|
Sammuttimen laukaisin ja päävirtakytkin
auton perässä
Extinquisher trigger and main switch at the rear of the car
Krominen nappi on peruutuskameraoptiolle (lue: meni reikä väärään
paikkaan)...
The chromed plug is for optional rear view camera (read: drilled a hole to
the wrong place)... |
|
|
|
Suojakaaret Kovassa ajossa Midgetissä tulee melko orpo olo, jos
auto sattuisi suistumaan tieltä. Tuulilasin alumiinikehys ei kovin
paljon suojaa anna, jos auto menee katolleen.
Kesän 2014 Alppiajeluissa turvakaaria tuli niin ikävä, että aloin heti
suunnittelemaan niitä. Suojakaarien piti olla auton henkeen sopivat
eli oli pakko tehdä kompromisseja. Päädyin lopulta ulkonäkösyistä
kaksiosaiseen kaariratkaisuun ja suffailemalla netissä löysin melko
hyvännköisen ratkaisun. Putkena on 42 mm rosteria eli
kestävyyttä on taatusti riitävästi. Kiinnityspalat ovat 5 mm rosteria.
TIG-hitsaukset piti tehdä itse, mutta onneksi saimme paikalle alan mestarin
hitsariksi. TIG-hitsaus on vaikein hitsauksen muoto! |
|
Roll cage During fast driving to feel yourself quite unsafe in case
your car would roll over. The windscreen frame is not of very
much help in this situation.
During the 2014 Alps tour I missed a roll cage so much that I immediately
started planning one. There are several difficulties here: the roll
cage should not be too dominant looking and there is not much space to use
(remember that the seats are not original but larger bucket seats).
While surfing in the web, I finally came across this solution which pleased
me (note this is not a Mk1). The tube is of 42 mm extra strong stainless
steel and the brackets 5 mm thick. I simplified the model solution as
the fixing points are very strong. I had plans to do the TIG welding
myself but luckily managed to get a true professional to do the welding.
TIG welding is the most difficult method of welding! |
|
|
|
Netistä löytynyt esimerkki turvakaaresta
One sample of roll cages found on the web
|
|
Rosterisia kaarien osia odottamassa
hitsaamista ...
Stainless steel roll cage parts ready for some welding ... |
|
|
|
Osat esikasattu TIG-hitsausta ja
kiillotusta varten.
Part pre-assemled for TIG welding and polishing.
|
|
Melko siistit liitokset ...
Quite good looking joinery ... |
|
|
|

Ammattimiehen
TIG-hitsausta
Professional TIG welding |
|
Jäähdytys menossa. Vapaaehtoisia
kiillottamaan 'kromiseksi' ?
Cooling down in progress. Volunteers needed for polishing this to
'chrome'. |
|
|
|
 Päivän
kiillotuksen jälkeen rosteriputki alkoi kiiltämään - ei ihan pikkuhomma! Päivän
kiillotuksen jälkeen rosteriputki alkoi kiiltämään - ei ihan pikkuhomma!
It took a whole day to get the stainless tube
to shine like this! |
|
Ja sitten kiillotusjälkien putsauksessa käyetty liuotin leimahti liekkeihin
rukkassissa...
And the solvent used to remove the polishing resudues ingnited and
burnt both hands ... |
|
|
|
|
|
|
|
|
|
Hätävilkut Kesän 2014 Eurooppa-turneella
joutui autoa korjailemaan lähes päivittäin ja melko useasti melko
pahoissa paikoissa. Autossa ei ole mitään hätävilkkuja eli varsinkin
Saksassa ja Alpeilla tämä on suorastaan hengenvaarallista.
Vikkuja varten on saatavissa muunnossarjoja, joilla nykyisetkin vilkut
saisi toimimaan hätävilkkuina. Vilkut ovat vaan niin onnettomat, että
niitä ei noteeraisi kukaan. Päätin sen sijaan asentaa taakse
4-polttimoisen LED-vilkkumajakan, joka on niin kirkas että taatusti
huomataan. Hätämajakan kytkimet asensin takaluukkuun sekä FIA-paneeliin
ohjaamossa.
Toiseen projektiini löytyy isompi 6-polttimoinen versio. Saisikohan
sen ledit vaihdettua siniseksi? Voisi asentaa eteen, niin Midgetti
kävisi poliisiautosta ... |
|
Emergency lights During my 2014 European trip
I had to fix the car nearly every day and very often in very dangerous
spaces. There are no hazard lights in the car and specially in
Germany and in the Alps this is almost suicidial.
There are conversion kits available which will make the original
indicator lights work as emergency lights. Unfortunately the old
indicator lights are so poor that knowone would notice them. I
ended up in a simpler solution by installing a LED based (4 leds) emergency
beacon at the rear of the car. It is so bright and has a very
noticeable blinking pattern that it surely will be noticed. I
installed two switches for this beacon: one in the boot and one in the
FIA-panel in the cockpit.
For another project of mine, I have also a 6 led version of this beacon.
I wonder whether the leds could be changed to blue ones. Then I could
use my Midget like a police car ... |
|
|
|
Blink- blink ... |
|
Tyypillinen huoltotauko 2014 reissun aikana jossain Alpeilla
Typical service break during the 2014 tour somewhere at the Alps |
|
|
|
Hinaussilmukat Hinaussilmukoita muiden autojen hinaamiseen
löytyy nyt edestä 2 kpl ja takaa yksi .. |
|
Towing points There are now three towing points in
the car - two in the front and one in the back - in order to tow other
cars ... |
|
|
|
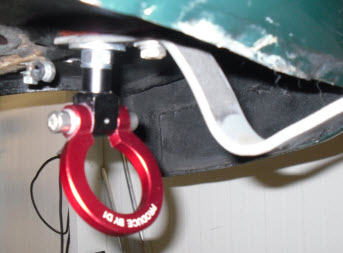
Takapään hinaussilmukka (Björk Motorsport)
Rear towing eye |
|
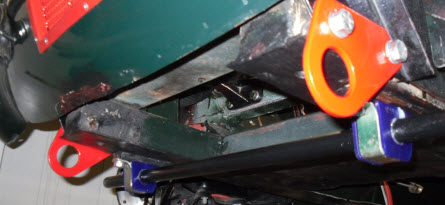
Vakiomalliset hinaussilmukat edessä
Standard Midget type towing points in the front |
|
|
|
Alkuun / Top
|
|
|
|
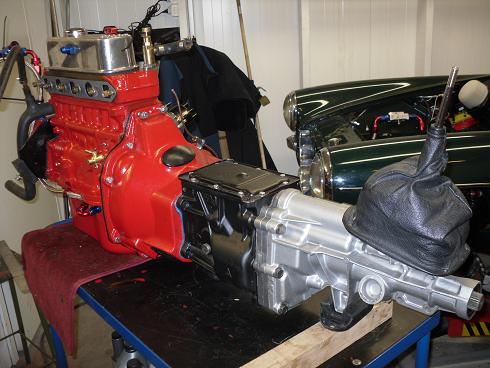
Vaihdelaatikon päivittäminen
(Frontline)
|
|
Up-rating the gearbox (Frontline)
|
|
|
|
Auto, jossa on osittain synkronoimaton vaihdelaatikko, ei ole optimaalinen
kovaa ajamiseen. Tämän opin lopullisesti Alppiränneissä, joissa
neulansilmissä oli pakko heittää ykköstä silmään riippumatta oliko menossa
ylös vai tulossa alas.
Jo EVO2 vaiheessa katselin kieli pitkällä Frontlinen 5-lovisen laatikon
konversiosarjaa. Se perustuu luotettavaan Ford T9-tyypin 5-loviseen
laatikkoon.
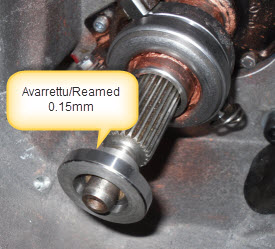
Laatikon kasauksen yhteydessä ei ollut kuin muutama perustavaa laatua
oleva ongelma, joista vääränkokoiset aluslevyt olivat pienin riesta.
Onneksi tuli kokeiltua kytkinakselille tulevaa sovituspuslaa ennen sen
kiinnitystä kampiakseliin: sen pusla oli 0.15 mm liian tiukka eikä siten
pyörinyt vapaasti akselilla.
Tällä hetkellä kerään henkisiä voimia tehdä
mittavia muutoksia
vaihdekepin uutta paikkaa varten! Hommasin Frontline.n setin, koska
ohjeissa sanottiin, ettei paikka vaihdu. Että sellaista! |
|
A car with a partially non-syncronised gearbox is not indeed very ideal for
fast driving. I learned this for good in the Alps during my 2014 tour.
In the very tight corners you had to change to the first gear (non-syncro)
all the time regardless whether you are driving up hill or down hill.
I have dreamed of a (Frontline) 5-speed gearbox already while building the
EVO1 version. The kit is based on reliable Ford T9 type gearbox.
During the assembly I had only the typical fitting problems of which the
wrong size washers was the smallest one. The major and fatal problem
was that the adaptor between the gearbox shaft to the crankshaft was 0.15mm
too tight. This would have caused the gearbox bearings to wear down prematerly.
The gearstick definately isn't at the same location as with the original
gearbox as Frontline states! |
|
|
|
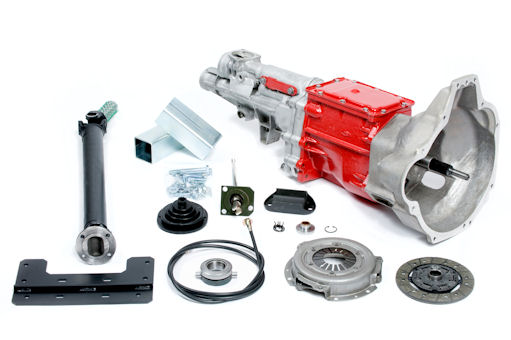
Frontlinen konversiosarjan sisältö
Content of Frontline 5-speed conversion kit |
|
Huom: Punainen kytkinkoppa on itse pulverimaalattu!
Note: The red clutch housing is DIY powder coated. |
|
|
|
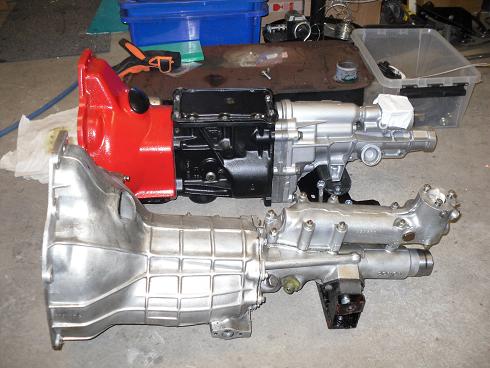
Vanha ja uusi laatikko vierekkäin
Old and new gearboxes side by side |
|
 |
|
|
|
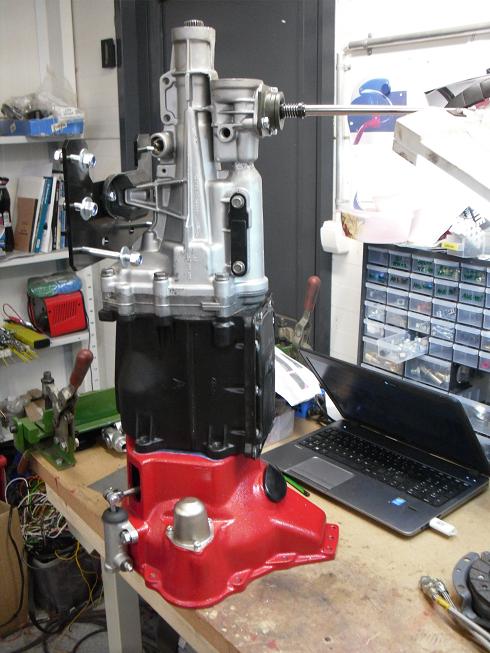
Kirurgin pöydällä tehty laatikon ja
moottorin liittäminen tehty!
Gearbox and engined connected on the surgeon's table! |
|
Tulipa lisättyä tyhjennystulppa ..
Added a drainage plug ... |
|
|
|
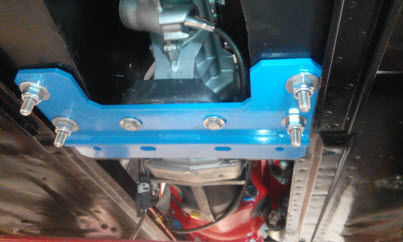
Laatikon takapään tuentalevy (2 pulttia
puuttuu vielä)
Rear support plate place (two of the bolts not in place) |
|
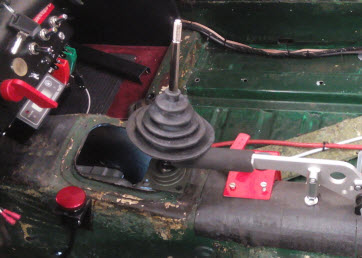
Vaihdekepin paikka säilyy
samana ... - perskele!!
Location of the gear stick remains the same - SHIT !! |
|
|
|
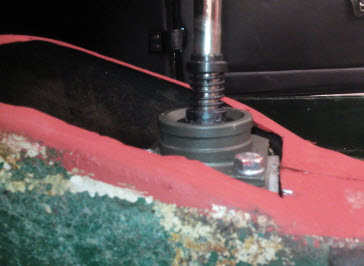
Alustavasti muokattu kardaarnitunneli.
Huom. kepin kiinnityspultti !
Roughly modified top of the tunnel. Note the highest located bolt!
|
|
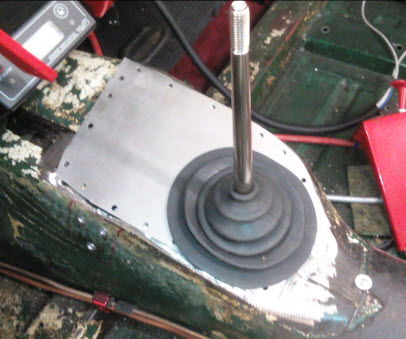
Kardaanitunnelin petitelevyn aihio.
Blanking plate and the rubber gaitor. |
|
|
|
Valmis / Finished ! |
|
|
|
|
|
Alkuun / Top
|
|
|
|
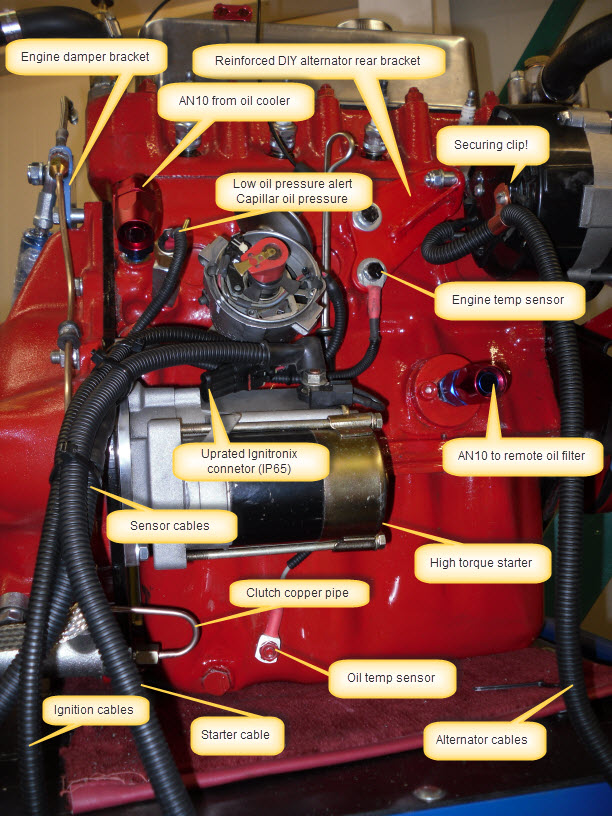
Moottori
|
|
Engine
|
|
|
|
 |
|
|
|
Moottori jouduttiin peruskorjaamaan kesän 2014 öljy- ja lämpöongelmien
takia. Lisäksi alkuperäinen koneistustyö oli niin ala-arvoista, että
niitä piti tehdä uudestaan Keski-Suomen Koneistamo Oy:ssä. Se
siitä Mossin Stage2 moottoreiden
laadusta. Kaikki laakeripinnat on nyt hiottu tai kiillotettu ja kampi
tasapainotettu. Koneistamo halusi välttämättä vaihdattaa myös männänrenkaat, vaikka
ulkoisesti olivat aivan hyvän näköiset. Varma on kuitenkin varmaa.
Ongelmana olikin löytää jostain 1275cc 0.060" ylikokorenkaat. Suomesta
ei löytynyt mistään ja Mossiltakin oli varastosta 'loppu'.
Päätin lopulta vaihtaa tilalle kokonaan uudet 9.75CR 0.060" männät.
Nokka-akselin nostinkupit oli pakko vaihtaa, sillä ne olivat aivan
kuluneet röpöisiksi. Veikkaan, että olivat huonokuntoiset jo
saadessani ko. vaihtomoottorin. Uuudet nostinkupit ovat kevennetyt ja
tehty lujemmasta materiaalista. |
|
The engine had to be totally rebuilt due to heat problems during my 2014 'Fast
and Furious' tour to the Alps. In addition much of the original
modification work done by Ivor Searley in UK had to be redone due poor
quality. Now all the bearing surfaces have been polished or grinded and
the crankshaft properly balanced. The engine shop requested me to have
the piston rings also to be changed. There was no visible damage in
them and all were within accectable dimensions. This raised a big
problem to me: it is very difficult to find 0.060" oversize piston rings
(Hepolite pistons). Finally I decided to order them from Moss, who
told that they should have them in stock withing weeks. Well, the
English two weeks has turned out to be at least one month and finally had to
order totally new 9.75CR 0.060" pistons from another supplier.
The cam followers had to be changed as their contact surface to the cam
were so worn out. Shouldn't happen in a newly rebuild Stage2
engine? I will replace the followers with new lightened and tufrided
versions. |
|
|
|
Vauhtipyörä Vauhtipyörää päätin keventää
kilon verran samalla kun se oli keskiön sorvauksessa. Painaa vielä
noin 6.1 kg eli ei vielä mikään ralliversio. Huomaa
vauhtipyörän keskössä oleva pusla. Fordin T9-vaihdelaatikon päivitys vaatii
tämmöisen (tulee kitin mukana).
|
|
Flywheel The flywheel was lightened by some 1
kg. It still weights about 6.1 kg so not any race version yet.
Note the the spigot bush in the center of the flywheel. The Ford T9
gearboxe's shaft requires this modification (comes in the kit). |
|
|
|
|
|
|
|
Kampiakselin takapään lisätiiviste Tämä tuli
asennettua jo vuosi sitten, mutta asennusvirheen takia tuhoutui heti
kättelyssä. Kun stefa on asennettuna, pitää ehdottomasti tarkistaa,
että vauhtipyörä ei purista stefan otapintaa. Kitin mukana tulee
välilevy, jota voi käyttää kampiakselin ja vauhtipyrän välissä. |
|
Crankshaft rear seal kit I installed this kit
a year ago but it got totally destroyed due to inproper installation.
After you have installed this kit, you absolutely must measure that the
flywheel is not pressing the face of the seal. There is a distance
piece in the kit than can be used if this happens. It will be installed
between the crank end and the flywheel. |
|
|
|

|
|
|
|
Venttiilivivusto Evo2 version asennettu halpa
MiniSportin 1.5:1 välityksellä olevan vivuston laakerit olivat jo nyt
kuluneet turhan väljiksi. Onneksi vivustosssa on rullalaakeri venttilivartta
varten eli pienet poikkeamat vivun asennoissa eivät ole kovin vakavia.
Päätin pikällisen harkinnan jälkeen vaihtaa tilalle hieman laadukkaamman MED
Engireeningin version. |
|
Rocker mechanism The 'cheap' 1.5:1 rocker installed to EVO2
was
already worn quite badly specially the axel beargings. Luckily the
version was with roller tips and thus the uneven rocker arm movevent was
'compensetated'. After careful consideration I ended up to
up-rate the rocker to a version manufactured by MED Enginering in UK. |
|
|
|
|
|
|
|

Minisport 1.5:1 (EVO2) |
|
MED-Engineering 1.5:1 |
|
|
|
Moottorin vakaajatanko Olin jo pitkään
epäillyt, että moottori vaatii jonkilaisen tuennan - joko tukitangon tai
vaimentimen. Pakosarjasta ja öljynsuodattimessa on selkeitä jälkiä
siitä, että moottori 'vääntyy' kovassa ajossa. Tämä ei pitkän
päälle tee hyvää moottorin kiinnikkeille. Aluksi suunnittelin
kiinteää kumipuslilla olevaa tukitankoa mutta sitten löysin eBay:stä Toyotan
driftin autoissa käytettävään säädettävään vaimentimeen - siis tavallaan
iskariin.
Koska hinta ei ollut paha (40€), ostin sellaisen samantien.
Vaimentimen pituus on säädettävissä 200-250 mm välillä ja tarkoitus on tehdä
itse kiinnikkeet moottorin ja vaihdelaatikon pulttien alle sekä runkoon.
Huom: Käytettäessä Fordin T9-tyyppistä vaihdelaatikkosa (esim.
Frontlinen konversiosarja), on moottorin vakaajatanko lähes pakollinen.
T9-laatikossa ei ole kuin yksi tukipiste takana eli siinä ei ole lainkaan
tuentoja vääntövoimia vastaan kuten Midgetin alkuperäisessä laatikossa. |
|
Engine Damper I have noticed that the engine
should have a steady bar or damper. There are clear signs that the
engine is moving under heavy torque. The oil filter for example hits
the car body. First I thought of solving this with a
standard solution: engine steady bar. Then I run into a better
solution: an engine damper used in drifting cars.
I bought a damper originally made for Toyota Celica/Supra models. I
is adjustable between 200-250 mm in length and I will make brackets under
the engine block/gearbox bolts and the cars body. The cost in eBay UK
is approx. 30 £.
Note: When using Ford's T9 type gearbox (Frontline 5-speed kit) this kind of
stabilizer or damper must be installed! The T9 box has only one
supporting point at the rear and this allows the gearbox (and thus the
engine) to 'twist' under
torque.
|
|
|
|
|
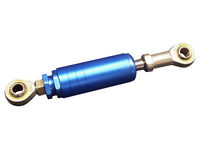
Engine Damper |
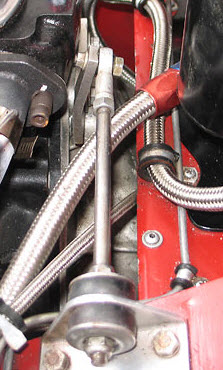
Engine steady bar (Derek Chima's Midget) |
|
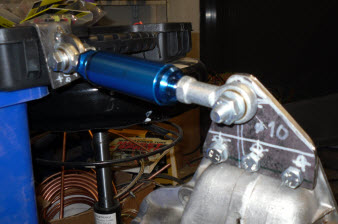
Kiinnityksen prototyyppi
Prototypes of fixing brackets |
|
|
|
Alkuun / Top
|
|
|
|
Ohjaus
Midgetin ohjaus on sinällään ihan toimiva, mutta ratti tulee
kuppi-istuinta käytettäessä liian lähelle ja alas. Aiemmin rattina oli
puinen (ja liukas) versio mutta päivitin sen 2-puolaiseen 'rallirattiin'.
Ohjausakselin nosto n. 20 mm:llä oli brutaali mutta helppo toimenpide.
Hankalampi oli saada ratti mahdollisimman lähelle kojelautaa ja tämä vaati
ohjausakselinkin lyhentämistä 35 millillä. |
|
Steering
The steering in the Midget is very good as it is. Only problem is
the location of the steering wheel. I used to have a small wooden
steering wheel but it was too slippery. The steering axle had to be
raised by some 20 mm in order to get a 'racing version' installed and the
steering axle shortened. Otherwise the steering wheel would have been
to close to the driver. Remember that EVO3 has Cobra racing seats
which are much higher and deeper than original ones. |
|
|
|
Ratin testiasennus
Trial fitting of the steering wheel |
|
Uusi ja alkuperäinen 'väliholkki': huom. äänitorven maadoitus
The new and original steering wheel 'gaitor'. Note the grounding plate
for the horn.
|
|
|
|
|
|
|
|
|
|
|
|
|
|
Nippeleitä
Autoon on tullut asennettua sellaisiakin lisälaitteita, joiden järkevyys
saattaa tuntua kyseenalaiselta. Kaikille lisälaitteille on kuitenkin
selvä tarve - vaikka aivan satunnainenkin. |
|
Gadgets
There are many things installed to the car that may sound irrelevant.
All of them have a sound purpose.
|
|
|
|
Ilmasuhdemittari Ehdoton Weberiä säädettäessä sekä ajettaessa suuremmissa korkeuksissa.
Alpeilla pitä yli 1km korkeudessa muuttaa seoksia, jotta kone kävi kunnolla.
Käytän samaa Lambda-sensoria muissakin autoissa eli mittari on tehty
helpoksi irroittaa.
Sisä/ulkolämpötilamittari
Sisälämpötila ei ole kovin kiinnostava, koska sen kyllä avoautossa tietää.
Ulkoanturi on asennettu konehuoneeseen ja tällä hetkellä se mittaa imuilman
lämpötilaa. Jos lämpötila on kovin korkea, täytyy pohtia
konehuoneeseen lisää jäähdytysaukkoja.
Motonetin versiossa on peräti mustan jään varoittaja eli äärimäisen
olennainen kesäautossa!
Öljyn lämpömittari
Tein varoiksi 1/4" NPT kierteet lämpötilan anturille myös
öljynsuodattimen jalkaankin. Mittarina on Bilteman halpismittari ja
asennan sen kojelaudan alle 'piiloon'. Mittarin avulla voin varmistaa
öljynlauhduttimen toiminnan vertaamalla lukemia öljypohjassa olevan anturin
antamiin lukemiin.
|
|
Air/Fuel ratio gauge This is almost a must
when tuning the Weber carburettor under rapidly changing environments.
For example in the Alps (over 1000 meters), you must adjust the carburettor
and ignition timing as the air get thinner. I use the same gauge in
several cars having only welded a M18 plug to their exhausts for the lambda
sensor.
Indoor/outdoor temperature gauge
Reason for installing this cheap gauge is, that it measuring engine bay
temperature. The 'outdoor' sensor can be fitted to various spots in
the engine bay giving thus hints whether the enginebay ventilation is
working. At the moment it is measuring air temperature near the
Weber air filter.
A handy 'Black Ice' warning came as a bonus. Very vital
information during the summers! Oil temp gauge
I made 1/4" NPT threads for a temp. sensor also to the remote filter
head. I have a cheap oil temp gauge that is hidden under the
dashboard. Comparing this reading I can verify that the oil
cooler is working properly as there is another sensor in the oil pan. |
|
|
|
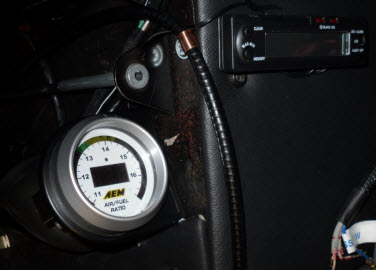
Air/fuel + temperature display |
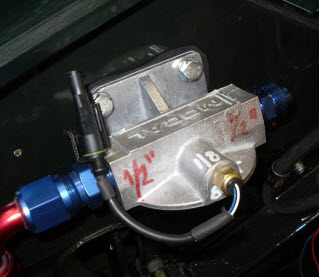
Oil temp sensor in the oil filter head
Note: IP65 wiring connector |
|
|
|
Roiskeläpät
Autossa ei ennestään ollut roiskeläppiä, koska olin etsinyt
'Midget'-tekstillä olevia kumisia versioita. Myynnissä on ainoastaan
moderneja muoviläpysköjä. Varsinkin takapäässä läpille on
käyttöä, koska sinne tulee isompi Al-bensatankki liityntöineen. Läpät
ovat ralliautoissa käytettävää jäykkää kumia ja kiinnitetty kolmella 4.8mm
pop-niiteillä, joiden alle on laitettu M5 rosterinen korialuslevy - kyllä
pysyy! |
|
Mudflaps I have had plans to install mudflaps
to the rear since EVO1. Had no success in finding proper ones with MG
or Midget text and thus ended to modern heavy duty rubber material used in
real WRC cars.
There is true need for these at the rear as the new fuel tank will have
connections on the right side - just behind the rear wheel! The flaps
are fitted with three 4.8 mm pop rivets having M5 stainless steel body
washers under them. |
|
|
|
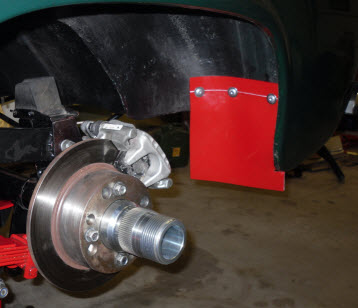 |
|
|
|
|
|
USB-Endoskooppi
Tämä letkukamera (15€ eBay UK:ssa) kulkee pitkillä reissuilla mukana,
koska tällöin mukana on läppäri, johon sen voi kytkeä. Sille löytyi
hyvää käyttöä, kun kasattu moottori laatikoineen putosi lattaialle nosturin
kaaduttua. |
|
USB-Endoscope This (8 £ at eBay) device is in
my tool pack during longer tours as then I always have a laptop with
me. I found good use for it when investigating the engine's internal
parts after the engine and gearbox had dropped when the engine hoist tilted. |
|
|
|
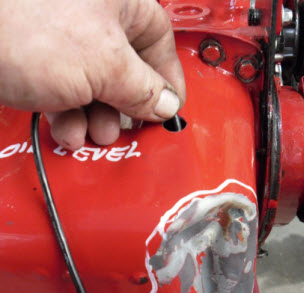
Pahalta näyttää ulkoisesti, mutta ...
Looks bad outside but ... |
|
Live videota kiertokangen päästä: kaikki OK
Live video of the conrod end cap: all Ok |
|
|
|
|